标签归档:Ultimate ASP.NET Core Web API

Chapter14:ASYNCHRONOUS CODE

14 ASYNCHRONOUS CODE

In this chapter, we are going to convert synchronous code to asynchronous inside ASP.NET Core. First, we are going to learn a bit about asynchronous programming and why should we write async code. Then we are going to use our code from the previous chapters and rewrite it in an async manner.
在本章中,我们将在 Core 内部将同步代码转换为异步代码 ASP.NET。首先,我们将学习一些关于异步编程的知识,以及为什么要编写异步代码。然后,我们将使用前几章中的代码并以异步方式重写它。

We are going to modify the code, step by step, to show you how easy is to convert synchronous code to asynchronous code. Hopefully, this will help you understand how asynchronous code works and how to write it from scratch in your applications.
我们将逐步修改代码,向您展示将同步代码转换为异步代码是多么容易。希望这将帮助您了解异步代码的工作原理以及如何在应用程序中从头开始编写它。

14.1 Whatis Asynchronous Programmming?

Async programming is a parallel programming technique that allows the working process to run separately from the main application thread. As soon as the work completes, it informs the main thread about the result whether it was successful or not.
异步编程是一种并行编程技术,它允许工作进程与主应用程序线程分开运行。一旦工作完成,它就会通知主线程结果是否成功。

By using async programming, we can avoid performance bottlenecks and enhance the responsiveness of our application.
通过使用异步编程,我们可以避免性能瓶颈并增强应用程序的响应能力。

How so?
怎么会这样?

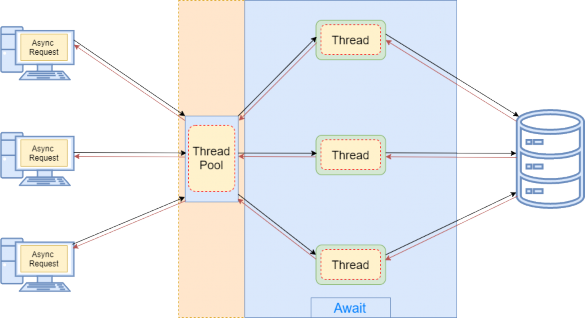
Because we are not sending requests to the server and blocking it while waiting for the responses anymore (as long as it takes). Now, when we send a request to the server, the thread pool delegates a thread to that request. Eventually, that thread finishes its job and returns to the thread pool freeing itself for the next request. At some point, the data will be fetched from the database and the result needs to be sent to the requester. At that time, the thread pool provides another thread to handle that work. Once the work is done, a thread is going back to the thread pool.
因为我们不再向服务器发送请求并在等待响应时阻止它(只要需要)。现在,当我们向服务器发送请求时,线程池会将线程委托给该请求。最终,该线程完成其工作并返回到线程池,为下一个请求释放自身。在某些时候,将从数据库中获取数据,并且需要将结果发送给请求者。此时,线程池提供另一个线程来处理该工作。工作完成后,线程将返回到线程池。

It is very important to understand that if we send a request to an endpoint and it takes the application three or more seconds to process that request, we probably won’t be able to execute this request any faster in async mode. It is going to take the same amount of time as the sync request.
了解这一点非常重要,如果我们向端点发送请求,并且应用程序需要三秒或更长时间来处理该请求,我们可能无法在异步模式下更快地执行此请求。这将花费与同步请求相同的时间。

The only advantage is that in the async mode the thread won’t be blocked three or more seconds, and thus it will be able to process other requests. This is what makes our solution scalable.
唯一的优点是,在异步模式下,线程不会被阻塞三秒或更长时间,因此它将能够处理其他请求。这就是使我们的解决方案具有可扩展性的原因。

Here is a visual representation of the asynchronous workflow:
下面是异步工作流的可视化表示形式:
Alt text

Now that we’ve cleared that out, we can learn how to implement asynchronous code in .NET Core.
现在我们已经清除了它,我们可以学习如何在 .NET Core 中实现异步代码。

14.2 Async,Await Keywords, and Return Types

The async and await keywords play a crucial part in asynchronous programming. By using those keywords, we can easily write asynchronous methods without too much effort.
async 和 await 关键字在异步编程中起着至关重要的作用。通过使用这些关键字,我们可以轻松地编写异步方法,而无需太多努力。

For example, if we want to create a method asynchronously, we need to add the async keyword next to the method’s return type:
例如,如果我们想异步创建一个方法,我们需要在方法的返回类型旁边添加 async 关键字:

async Task<IEnumerable<Company>> GetAllCompaniesAsync()

By using the async keyword, we are enabling the await keyword and modifying how method results are handled (from synchronous to asynchronous):
通过使用 async 关键字,我们将启用 await 关键字并修改方法结果的处理方式(从同步到异步):

await FindAllAsync();

In asynchronous programming, we have three return types:
在异步编程中,我们有三种返回类型:

  • Task, for an async method that returns a value.
    Task,用于返回值的异步方法。
  • Task, for an async method that does not return a value.
    任务,用于不返回值的异步方法。
  • void, which we can use for an event handler.
    void,我们可以将其用于事件处理程序。

What does this mean?
这是什么意思?

Well, we can look at this through synchronous programming glasses. If our sync method returns an int, then in the async mode it should return Task — or if the sync method returns IEnumerable, then the async method should return Task<IEnumerable>.
好吧,我们可以通过同步编程眼镜来看待这一点。如果我们的同步方法返回一个 int,那么在异步模式下它应该返回 Task — 或者如果同步方法返回 IEnumerable,则异步方法应返回 Task<IEnumerable>。

But if our sync method returns no value (has a void for the return type), then our async method should return Task. This means that we can use the await keyword inside that method, but without the return keyword.
但是,如果我们的同步方法不返回任何值(返回类型为空),那么我们的异步方法应该返回 Task。这意味着我们可以在该方法中使用 await 关键字,但没有 return 关键字。

You may wonder now, why not return Task all the time? Well, we should use void only for the asynchronous event handlers which require a void return type. Other than that, we should always return a Task.
你现在可能想知道,为什么不一直返回任务?好吧,我们应该只对需要空返回类型。除此之外,我们应该始终返回一个任务。

From C# 7.0 onward, we can specify any other return type if that type includes a GetAwaiter method.
从 C# 7.0 开始,我们可以指定任何其他返回类型(如果该类型包含 GetAwaiter 方法)。

Now, when we have all the information, let’s do some refactoring in our completely synchronous code.
现在,当我们掌握了所有信息时,让我们在完全同步的代码中进行一些重构。

14.2.1 The IRepositoryBase Interface and the RepositoryBase Class Explanation

We won’t be changing the mentioned interface and class. That’s because we want to leave a possibility for the repository user classes to have either sync or async method execution. Sometimes, the async code could become slower than the sync one because EF Core’s async commands take slightly longer to execute (due to extra code for handling the threading), so leaving this option is always a good choice.
我们不会更改提到的接口和类。这是因为我们希望为存储库用户类保留同步或异步方法执行的可能性。有时,异步代码可能会变得比同步代码慢,因为 EF Core 的异步命令执行时间稍长(由于处理线程的额外代码),因此保留此选项始终是一个不错的选择。

It is general advice to use async code wherever it is possible, but if we notice that our async code runes slower, we should switch back to the sync one.
一般建议尽可能使用异步代码,但是如果我们注意到异步代码的运行速度较慢,则应切换回同步代码。

14.3 Modifying the ICompanyRepository Interface and the CompanyRepository Class

In the Contracts project, we can find the ICompanyRepository interface with all the synchronous method signatures which we should change.
在合同项目中,我们可以找到 ICompanyRepository 接口,其中包含我们应该更改的所有同步方法签名。

So, let’s do that:
所以,让我们这样做:

    public interface ICompanyRepository
    {
        Task<IEnumerable<Company>> GetAllCompaniesAsync(bool trackChanges);
        Task<Company> GetCompanyAsync(Guid companyId, bool trackChanges);
        void CreateCompany(Company company);
        Task<IEnumerable<Company>> GetByIdsAsync(IEnumerable<Guid> ids, bool trackChanges);
        void DeleteCompany(Company company);
    }

The Create and Delete method signatures are left synchronous. That’s because, in these methods, we are not making any changes in the database. All we’re doing is changing the state of the entity to Added and Deleted.
“创建”和“删除”方法签名保持同步。这是因为,在这些方法中,我们没有对数据库。我们所做的只是将实体的状态更改为“已添加”和“已删除”。

So, in accordance with the interface changes, let’s modify our CompanyRepository.cs class, which we can find in the Repository project:
所以,根据接口的变化,让我们修改我们的

CompanyRepository.cs类,我们可以在存储库项目中找到它:

public class CompanyRepository : RepositoryBase<Company>, ICompanyRepository
{
    public CompanyRepository(RepositoryContext repositoryContext) : base(repositoryContext) { }

    //public IEnumerable<Company> GetAllCompanies(bool trackChanges) =>
    //    FindAll(trackChanges).OrderBy(c => c.Name).ToList();

    //public Company GetCompany(Guid companyId, bool trackChanges) =>
    //    FindByCondition(c =>
    //    c.Id.Equals(companyId), trackChanges)
    //    .SingleOrDefault();

    //public IEnumerable<Company> GetByIds(IEnumerable<Guid> ids, bool trackChanges) =>
    //    FindByCondition(x => ids.Contains(x.Id), trackChanges).ToList();

    public void CreateCompany(Company company) => Create(company);
    public void DeleteCompany(Company company) { Delete(company); }

    public async Task<IEnumerable<Company>> GetAllCompaniesAsync(bool trackChanges) => 
        await FindAll(trackChanges).OrderBy(c => c.Name).ToListAsync();

    public async Task<Company> GetCompanyAsync(Guid companyId, bool trackChanges) => 
        await FindByCondition(c => c.Id.Equals(companyId), trackChanges).SingleOrDefaultAsync();
    
    public async Task<IEnumerable<Company>> GetByIdsAsync(IEnumerable<Guid> ids, bool trackChanges) => 
        await FindByCondition(x => ids.Contains(x.Id), trackChanges).ToListAsync();
}

We only have to change these methods in our repository class.
我们只需要在存储库类中更改这些方法。

14.4 IRepositoryManager and RepositoryManager Changes

If we inspect the mentioned interface and the class, we will see the Save method, which just calls the EF Core’s SaveChanges method. We have to change that as well:
如果我们检查提到的接口和类,我们将看到 Save 方法,该方法仅调用 EF Core 的 SaveChanges 方法。我们也必须改变这一点:

public interface IRepositoryManager
{
    ICompanyRepository Company { get; }
    IEmployeeRepository Employee { get; }

    // void Save();
    Task SaveAsync();

}

And class modification:
和类修改:

//RepositoryManager.cs

//public void Save() => _repositoryContext.SaveChanges();
public Task SaveAsync() => _repositoryContext.SaveChangesAsync();

Because the SaveAsync(), ToListAsync()… methods are awaitable, we may use the await keyword; thus, our methods need to have the async keyword and Task as a return type.
因为 SaveAsync(), ToListAsync()… 方法是等待的,我们可以使用 await 关键字;因此,我们的方法需要有异步关键字和任务作为返回类型。

Using the await keyword is not mandatory, though. Of course, if we don’t use it, our SaveAsync() method will execute synchronously — and that is not our goal here.
但是,使用 await 关键字不是强制性的。当然,如果我们不使用它,我们的 SaveAsync() 方法将同步执行——这不是我们的目标。

14.5 Controller Modification

Finally, we need to modify all of our actions in the CompaniesController to work asynchronously.
最后,我们需要修改我们所有的操作

So, let’s first start with the GetCompanies method:
公司控制器异步工作。因此,让我们首先从 GetCompanies 方法开始:

[HttpGet]
public async Task<IActionResult> GetCompanies()
{
    var companies = await _repository.Company.GetAllCompaniesAsync(trackChanges: false);
    var companiesDto = _mapper.Map<IEnumerable<CompanyDto>>(companies);
    return Ok(companiesDto);
}

We haven’t changed much in this action. We’ve just changed the return type and added the async keyword to the method signature. In the method body, we can now await the GetAllCompaniesAsync() method. And that is pretty much what we should do in all the actions in our controller.

我们在这个行动中没有太大变化。我们刚刚更改了返回类型,并将 async 关键字添加到方法签名中。在方法主体中,我们现在可以等待 GetAllCompaniesAsync() 方法。这几乎是我们在控制器中的所有操作中应该做的事情。

So, let’s modify all the other actions.
因此,让我们修改所有其他控制器。

GetCompany:

[HttpGet("{id}", Name = "CompanyById")]
public async Task<IActionResult> GetCompany(Guid id)
{
    var company = await _repository.Company.GetCompanyAsync(id, trackChanges: false);
    if (company == null)
    {
        _logger.LogInfo($"Company with id: {id} doesn't exist in the database.");
        return NotFound();
    }
    else
    {
        var companyDto = _mapper.Map<CompanyDto>(company);
        return Ok(companyDto);
    }
}

GetCompanyCollection:

[HttpGet("collection/({ids})", Name = "CompanyCollection")]
public async Task<IActionResult> GetCompanyCollection([ModelBinder(BinderType = typeof(ArrayModelBinder))] IEnumerable<Guid> ids)
{
    if (ids == null)
    {
        _logger.LogError("Parameter ids is null");
        return BadRequest("Parameter ids is null");
    }
    var companyEntities = await _repository.Company.GetByIdsAsync(ids, trackChanges: false);
    if (ids.Count() != companyEntities.Count())
    {
        _logger.LogError("Some ids are not valid in a collection");
        return NotFound();
    }
    var companiesToReturn = _mapper.Map<IEnumerable<CompanyDto>>(companyEntities);
    return Ok(companiesToReturn);
}

CreateCompany:

[HttpPost]
public async Task<IActionResult> CreateCompany([FromBody] CompanyForCreationDto company)
{
    if (company == null)
    {
        _logger.LogError("CompanyForCreationDto object sent from client is null.");
        return BadRequest("CompanyForCreationDto object is null");
    }
    if (!ModelState.IsValid)
    {
        _logger.LogError("Invalid model state for the CompanyForCreationDto object");
        return UnprocessableEntity(ModelState);
    }
    var companyEntity = _mapper.Map<Company>(company);
    _repository.Company.CreateCompany(companyEntity);
    await _repository.SaveAsync();
    var companyToReturn = _mapper.Map<CompanyDto>(companyEntity);
    return CreatedAtRoute("CompanyById", new { id = companyToReturn.Id }, companyToReturn);
}

CreateCompanyCollection:

[HttpPost("collection")]
public async Task<IActionResult> CreateCompanyCollection([FromBody] IEnumerable<CompanyForCreationDto> companyCollection)
{
    if (companyCollection == null)
    {
        _logger.LogError("Company collection sent from client is null.");
        return BadRequest("Company collection is null");
    }
    var companyEntities = _mapper.Map<IEnumerable<Company>>(companyCollection);
    foreach (var company in companyEntities)
    {
        _repository.Company.CreateCompany(company);
    }
    await _repository.SaveAsync();
    var companyCollectionToReturn = _mapper.Map<IEnumerable<CompanyDto>>(companyEntities);
    var ids = string.Join(",", companyCollectionToReturn.Select(c => c.Id));
    return CreatedAtRoute("CompanyCollection", new { ids }, companyCollectionToReturn);
}

DeleteCompany:

[HttpDelete("{id}")]
public async Task<IActionResult> DeleteCompany(Guid id)
{
    var company = await _repository.Company.GetCompanyAsync(id, trackChanges: false);
    if (company == null)
    {
        _logger.LogInfo($"Company with id: {id} doesn't exist in the database.");
        return NotFound();
    }
    _repository.Company.DeleteCompany(company);
    await _repository.SaveAsync();
    return NoContent();
}

UpdateCompany:

[HttpPut("{id}")]
public async Task<IActionResult> UpdateCompany(Guid id, [FromBody] CompanyForUpdateDto company)
{
    if (company == null)
    {
        _logger.LogError("CompanyForUpdateDto object sent from client is null.");
        return BadRequest("CompanyForUpdateDto object is null");
    }
    if (!ModelState.IsValid)
    {
        _logger.LogError("Invalid model state for the CompanyForUpdateDto object");
        return UnprocessableEntity(ModelState);
    }
    var companyEntity = await _repository.Company.GetCompanyAsync(id, trackChanges: true);
    if (companyEntity == null)
    {
        _logger.LogInfo($"Company with id: {id} doesn't exist in the database.");
        return NotFound();
    }
    _mapper.Map(company, companyEntity);
    await _repository.SaveAsync();
    return NoContent();
}

Excellent. Now we are talking async.
非常好。现在我们正在谈论异步。

Of course, we have the Employee entity as well and all of these steps have to be implemented for the EmployeeRepository class, IEmployeeRepository interface, and EmployeesController.
当然,我们也有 Employee 实体,所有这些步骤都必须为 EmployeeRepository 类、IEmployeeRepository 接口和 EmployeesController 实现。

You can always refer to the source code for this chapter if you have any trouble implementing async code for the Employee entity.
如果您在为 Employee 实体实现异步代码时遇到任何问题,则始终可以参考本章的源代码。

After the async implementation in the Employee classes, you can try to send different requests (from any chapter) to test your async actions. All of them should work as before, without errors, but this time in an asynchronous manner.
在 Employee 类中实现异步后,您可以尝试发送不同的请求(来自任何章节)来测试异步操作。所有这些都应该像以前一样工作,没有错误,但这次是以异步方式。
Chapter12:WORKING WITH PATCH REQUESTS

12 WORKING WITH PATCH REQUESTS

In the previous chapter, we worked with the PUT request to fully update our resource. But if we want to update our resource only partially, we should use PATCH.
在上一章中,我们使用 PUT 请求来完全更新我们的资源。但是,如果我们只想部分更新我们的资源,我们应该使用 PATCH。

The partial update isn’t the only difference between PATCH and PUT. The request body is different as well. For the Company PATCH request, for example, we should use [FromBody]JsonPatchDocument and not [FromBody]Company as we did with the PUT requests.
部分更新并不是PATCH和PUT之间的唯一区别。请求正文也不同。例如,对于公司补丁请求,我们应该使用 [FromBody]JsonPatchDocument而不是像处理 PUT 请求那样使用 [FromBody]Company。

Additionally, for the PUT request’s media type, we have used application/json — but for the PATCH request’s media type, we should use application/json-patch+json. Even though the first one would be accepted in ASP.NET Core for the PATCH request, the recommendation by REST standards is to use the second one.
此外,对于 PUT 请求的媒体类型,我们使用了 application/json — 但对于 PATCH 请求的媒体类型,我们应该使用 application/json-patch+json。 尽管第一个 ASP.NET Core会接受用于PATCH请求,但REST标准的建议是使用第二个。

Let’s see what the PATCH request body looks like:
让我们看看 PATCH 请求正文是什么样子的:


[ 
    {
         "op": "replace",
         "path": "/name", 
        "value": "new name" 
    }, 
    { 
        "op": "remove", 
        "path": "/name" 
    } 
]

The square brackets represent an array of operations. Every operation is placed between curly brackets. So, in this specific example, we have two operations: Replace and Remove represented by the op property. The path property represents the object’s property that we want to modify and the value property represents a new value.
方括号表示操作数组。每个操作都放在大括号之间。因此,在这个特定示例中,我们有两个操作:替换和删除由 op 属性表示。path 属性表示我们要修改的对象属性,value 属性表示新值。

In this specific example, for the first operation, we replace the value of the name property to a new name. In the second example, we remove the name property, thus setting its value to default.
在此特定示例中,对于第一个操作,我们将 name 属性的值替换为新名称。在第二个示例中,我们删除 name 属性,从而将其值设置为默认值。

There are six different operations for a PATCH request:
对于 PATCH 请求,有六种不同的操作:

OPERATION REQUEST BODY EXPLANATION
Add {
“op”: “add”,
“path”: “/name”,
“value”: “new value”
}
Assigns a new value to a required property.
为必需属性分配新值。
Remove {
“op”: “remove”,
“path”: “/name”
}
Sets a default value to a required property.
将默认值设置为必需属性
Replace {
“op”: “replace”,
“path”: “/name”,
“value”: “new value”
}
Replaces a value of a required property to a new value.
将必需属性的值替换为新值。
Copy {
“op”: “copy”,
“from”: “/name”,
“path”: “/title”
}
Copies the value from a property in the “from” part to the property in the “path” part.
将值从“from”部分中的属性复制到“path”部分中的属性。
Move {
“op”: “move”,
“from”: “/name”,
“path”: “/title”
}
Moves the value from a property in the “from” part to a property in the “path” part.
将值从“from”部分中的属性移动到“path”部分中的属性。
Test {
“op”: “test”,
“path”: “/name”,
“value”: “new value”
}
Tests if a property has a specified value.
测试属性是否具有指定的值。

After all this theory, we are ready to dive into the coding part.
在所有这些理论之后,我们准备深入研究编码部分。

12.1 Applying PATCH to the Employee Entity

Before we start with the controller modification, we have to install two required libraries:
在开始修改控制器之前,我们必须安装两个必需的库:

  • The Microsoft.AspNetCore.JsonPatch library to support the usage of JsonPatchDocument in our controller and
    Microsoft.AspNetCore.JsonPatch 库,支持在我们的控制器中使用 JsonPatchDocument 和

  • The Microsoft.AspNetCore.Mvc.NewtonsoftJson library to support request body conversion to a PatchDocument once we send our request.
    Microsoft.AspNetCore.Mvc.NewtonsoftJson 库,支持在我们发送我们的请求正文后转换为 PatchDocument请求。

As you can see, we are still using the NewtonsoftJson library to support the PatchDocument conversion in .NET 5. The official statement from Microsoft is that they are not going to replace it with System.Text.Json: “The main reason is that this will require a huge investment from us, with not a very high value-add for majority of our customers.”.
如您所见,我们仍在使用 NewtonsoftJson 库来支持 .NET 5 中的 PatchDocument 转换。Microsoft的官方声明是,他们不会用System.Text.Json取代它:“主要原因是这将需要我们的巨额投资,包括对于我们的大多数客户来说,这不是一个很高的附加值。

Once the installation is completed, we have to add the NewtonsoftJson configuration to IServiceCollection:
安装完成后,我们必须添加 NewtonsoftJson配置到 IServiceCollection:

services.AddControllers(config =>
{
    config.RespectBrowserAcceptHeader = true;
    config.ReturnHttpNotAcceptable = true;
}).AddNewtonsoftJson()
.AddXmlDataContractSerializerFormatters()
.AddCustomCSVFormatter();

Add it before the Xml and CSV formatters. Now we can continue.
将其添加到 XML 和 CSV 格式化程序之前。现在我们可以继续了。

We will require a mapping from the Employee type to the EmployeeForUpdateDto type. Therefore, we have to create a mapping rule for that.
我们需要从“员工”类型映射到“员工更新Dto”类型的映射。因此,我们必须为此创建一个映射规则。

If we take a look at the MappingProfile class, we will see that we have a mapping from the EmployeeForUpdateDto to the Employee type:
如果我们看一下 MappingProfile 类,我们将看到我们有一个从 EmployeeForUpdateDto 到 Employee 类型的映射:

CreateMap<EmployeeForUpdateDto, Employee>();

But we need it another way. To do so, we are not going to create an additional rule; we can just use the ReverseMap method to help us in the process:
但我们需要另一种方式。为此,我们不会创建其他规则;我们可以使用 ReverseMap 方法来帮助我们完成这个过程:

CreateMap<EmployeeForUpdateDto, Employee>().ReverseMap();

The ReverseMap method is also going to configure this rule to execute reverse mapping if we ask for it.
如果我们要求,ReverseMap 方法还将配置此规则以执行反向映射。

Now, we can modify our controller:
现在,我们可以修改我们的控制器:

//EmployeesController.cs

[HttpPatch("{id}")]
public IActionResult PartiallyUpdateEmployeeForCompany(Guid companyId, Guid id, [FromBody] JsonPatchDocument<EmployeeForUpdateDto> patchDoc)
{
    if (patchDoc == null)
    {
        _logger.LogError("patchDoc object sent from client is null.");
        return BadRequest("patchDoc object is null");
    }
    var company = _repository.Company.GetCompany(companyId, trackChanges: false);
    if (company == null)
    {
        _logger.LogInfo($"Company with id: {companyId} doesn't exist in the database.");
        return NotFound();
    }
    var employeeEntity = _repository.Employee.GetEmployee(companyId, id, trackChanges: true);
    if (employeeEntity == null)
    {
        _logger.LogInfo($"Employee with id: {id} doesn't exist in the database.");
        return NotFound();
    }
    var employeeToPatch = _mapper.Map<EmployeeForUpdateDto>(employeeEntity);
    patchDoc.ApplyTo(employeeToPatch);
    _mapper.Map(employeeToPatch, employeeEntity);
    _repository.Save();
    return NoContent();
}

You can see that our action signature is different from the PUT actions. We are accepting the JsonPatchDocument from the request body. After that, we have a familiar code where we check the patchDoc for null value and if the company and employee exist in the database. Then, we map from the Employee type to the EmployeeForUpdateDto type; it is important for us to do that because the patchDoc variable can apply only to the EmployeeForUpdateDto type. After apply is executed, we map again to the Employee type (from employeeToPatch to employeeEntity) and save changes in the database.
您可以看到我们的操作签名与 PUT 操作不同。我们正在接受来自请求正文的 JsonPatchDocument。之后,我们有一个熟悉的代码,我们在其中检查 patchDoc 的空值以及数据库中是否存在公司和员工。然后,我们从员工类型映射到员工更新Dto类型;这样做对我们来说很重要,因为 patchDoc 变量只能应用于 EmployeeForUpdateDto 类型。执行应用后,我们映射再次到员工类型(从员工到补丁到employeeEntity),并将更改保存在数据库中。

Now, we can send a couple of requests to test this code:
现在,我们可以发送几个请求来测试此代码:

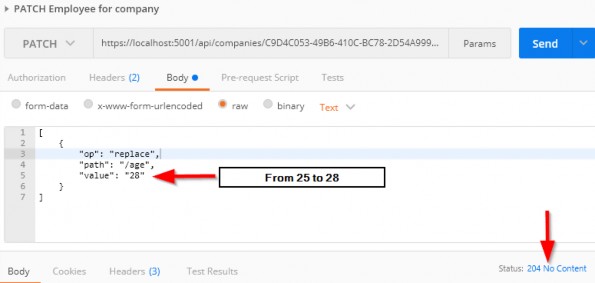
Let’s first send the replace operation:
让我们首先发送替换操作:

[
    {
        "op":"replace",
        "path":"/age",
        "value":"28"
    }
]

https://localhost:5001/api/companies/C9D4C053-49B6-410C-BC78-2D54A9991870/employees/80ABBCA8-664D– 4B20-B5DE-024705497D4A

Alt text

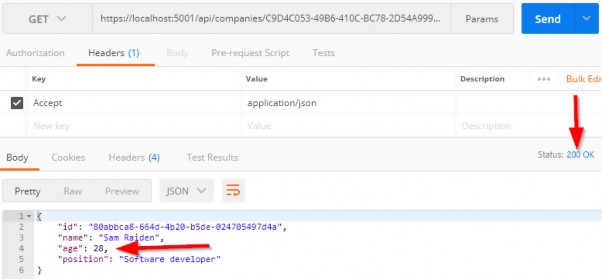
It works; we get the 204 No Content message. Let’s check the same employee:
它有效;我们收到 204 无内容消息。让我们检查同一个员工:

https://localhost:5001/api/companies/C9D4C053-49B6-410C-BC78-2D54A9991870/employees/80ABBCA8-664D– 4B20-B5DE-024705497D4A

Alt text

And we see the Age property has been changed.
我们看到 Age 属性已更改。

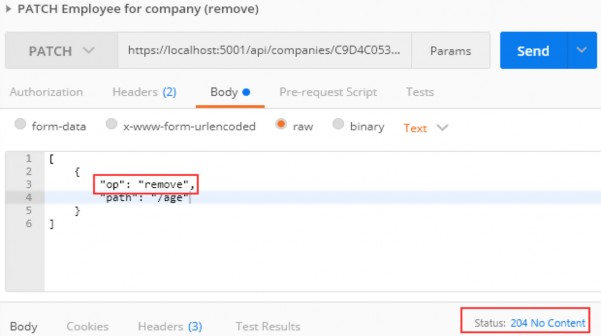
Let’s send a remove operation in a request:
让我们在请求中发送删除操作:

[
    {
        "op":"remove",
        "path":"/age"
    }
]

https://localhost:5001/api/companies/C9D4C053-49B6-410C-BC78-2D54A9991870/employees/80ABBCA8-664D– 4B20-B5DE-024705497D4A

Alt text

This works as well. Now, if we check our employee, its age is going to be set to 0 (the default value for the int type):
这也行得通。现在,如果我们检查我们的员工,它的年龄将设置为 0(int 类型的默认值):
Alt text

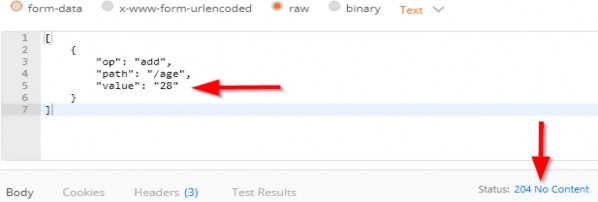
Finally, let’s return a value of 28 for the Age property:
最后,让我们为 Age 属性返回值 28:

[
    {
        "op":"add",
        "path":"/age",
        "value":"28"
    }
]

https://localhost:5001/api/companies/C9D4C053-49B6-410C-BC78-2D54A9991870/employees/80ABBCA8-664D– 4B20-B5DE-024705497D4A

Alt text

Let’s check the employee now:
现在让我们检查一下员工:

Alt text

Excellent.
非常好。

Everything is working well.
一切正常。

Chapter11:WORKING WITH PUT REQUESTS

11 WORKING WITH PUT REQUESTS

In this section, we are going to show you how to update a resource using the PUT request. We are going to update a child resource first and then we are going to show you how to execute insert while updating a parent resource.
在本节中,我们将向您展示如何使用 PUT 请求更新资源。我们将首先更新子资源,然后向您展示如何在更新父资源时执行插入。

11.1 Updating Employee

In the previous sections, we first changed our interface, then the repository class, and finally the controller. But for the update, this doesn’t have to be the case.
在前面的部分中,我们首先更改了接口,然后更改了存储库类,最后更改了控制器。但是对于更新,情况不一定如此。

Let’s go step by step.
让我们一步一步来。

The first thing we are going to do is to create another DTO class for update purposes:
我们要做的第一件事是创建另一个 DTO 类以进行更新:

//EmployeeForUpdateDto.cs

namespace Entities.DataTransferObjects
{
    public class EmployeeForUpdateDto
    {
        public string Name { get; set; }
        public int Age { get; set; }
        public string Position { get; set; }
    }
}

We do not require the Id property because it will be accepted through the URI, like with the DELETE requests. Additionally, this DTO contains the same properties as the DTO for creation, but there is a conceptual difference between those two DTO classes. One is for updating and the other is for creating. Furthermore, once we get to the validation part, we will understand the additional difference between those two.
我们不需要 Id 属性,因为它将通过 URI 接受,就像 DELETE 请求一样。此外,此 DTO 包含与用于创建的 DTO 相同的属性,但这两个 DTO 类之间存在概念差异。一个用于更新,另一个用于创建。此外,一旦我们进入验证部分,我们将了解这两者之间的其他区别。

Because we have additional DTO class, we require an additional mapping rule:
因为我们有额外的 DTO 类,所以我们需要一个额外的映射规则:

//MappingProfile.cs

CreateMap<EmployeeForUpdateDto, Employee>();

Now, when we have all of these, let’s modify the EmployeesController:
现在,当我们拥有所有这些时,让我们修改员工控制器:

//EmployeesController.cs

    [HttpPut("{id}")]
    public IActionResult UpdateEmployeeForCompany(Guid companyId, Guid id, [FromBody] EmployeeForUpdateDto employee)
    {
        if (employee == null)
        {
            _logger.LogError("EmployeeForUpdateDto object sent from client is null.");
            return BadRequest("EmployeeForUpdateDto object is null");
        }
        var company = _repository.Company.GetCompany(companyId, trackChanges: false);
        if (company == null)
        {
            _logger.LogInfo($"Company with id: {companyId} doesn't exist in the database.");
            return NotFound();
        }
        var employeeEntity = _repository.Employee.GetEmployee(companyId, id, trackChanges: true);
        if (employeeEntity == null)
        {
            _logger.LogInfo($"Employee with id: {id} doesn't exist in the database.");
            return NotFound();
        }
        _mapper.Map(employee, employeeEntity);
        _repository.Save();
        return NoContent();
    }

We are using the PUT attribute with the id parameter to annotate this action. That means that our route for this action is going to be:
api/companies/{companyId}/employees/{id}.

我们将 PUT 属性与 id 参数一起使用来注释此操作。这意味着我们执行此操作的路由将是:
api/companies/{companyId}/employees/{id}。

As you can see, we have three checks in our code and they are familiar to us. But we have one difference. Pay attention to the way we fetch the company and the way we fetch the employeeEntity. Do you see the difference?
如您所见,我们的代码中有三个检查,我们很熟悉它们。但我们有一个区别。注意我们获取公司的方式以及我们获取员工实体的方式。你看出区别了吗?

The trackChanges parameter is set to true for the employeeEntity. That’s because we want EF Core to track changes on this entity. This means that as soon as we change any property in this entity, EF Core will set the state of that entity to Modified.
对于 employeeEntity,trackChanges 参数设置为 true。这是因为我们希望 EF Core 跟踪此实体上的更改。这意味着,只要我们更改此实体中的任何属性,EF Core 就会将该实体的状态设置为“已修改”。

As you can see, we are mapping from the employee object (we will change just the age property in a request) to the employeeEntity — thus changing the state of the employeeEntity object to Modified.
如您所见,我们正在从 employee 对象(我们将只更改请求中的 age 属性)映射到 employeeEntity,从而将 employeeEntity 对象的状态更改为 Modified。

Because our entity has a modified state, it is enough to call the Save method without any additional update actions. As soon as we call the Save method, our entity is going to be updated in the database.
由于我们的实体具有修改状态,因此无需任何其他更新操作即可调用 Save 方法。一旦我们调用 Save 方法,我们的实体就会在数据库中更新。

Finally, we return the 204 NoContent status.
最后,我们返回 204 NoContent 状态。

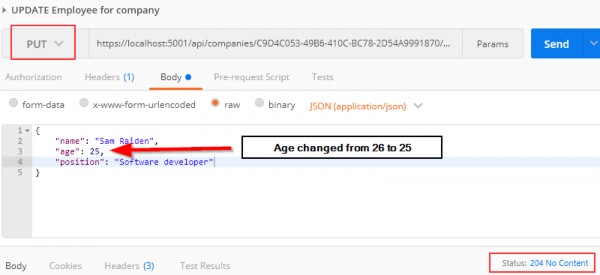
We can test our action:
我们可以测试我们的操作:

{
    "name":"Sam Raiden",
    "age":25,
    "position":"Software developer"
}

https://localhost:5001/api/companies/C9D4C053-49B6-410C-BC78-2D54A9991870/employees/80ABBCA8-664D-4B20-B5DE-024705497D4A

Alt text

And it works; we get the 204 No Content status.
它有效;我们得到 204 无内容状态。

We can check our executed query through EF Core to confirm that only the Age column is updated:
我们可以通过 EF Core 检查已执行的查询,以确认仅更新了“年龄”列:

Alt text

Excellent.
非常好。

You can send the same request with the invalid company id or employee id. In both cases, you should get a 404 response, which is a valid response to this kind of situation.
您可以使用无效的公司 ID 或员工 ID 发送相同的请求。在这两种情况下,您都应该得到 404 响应,这是对这种情况的有效响应。

Additional note: As you can see, we have changed only the Age property, but we have sent all the other properties with unchanged values as well. Therefore, Age is only updated in the database. But if we send the object with just the Age property, without the other properties, those other properties will be set to their default values and the whole object will be updated — not just the Age column. That’s because the PUT is a request for a full update. This is very important to know.
附加说明: 如您所见,我们只更改了 Age 属性,但我们也发送了具有未更改值的所有其他属性。因此,年龄仅在数据库中更新。但是,如果我们发送的对象只包含 Age 属性,而不发送其他属性,则这些其他属性将设置为其默认值,并且整个对象将被更新 — 而不仅仅是 Age 列。这是因为 PUT 是对完整更新的请求。了解这一点非常重要。

11.1.1 About the Update Method from the RepositoryBase Class

Right now, you might be asking: “Why do we have the Update method in the RepositoryBase class if we are not using it?”
现在,您可能会问:“如果我们不使用 RepositoryBase 类中的 Update 方法,为什么会有它?

The update action we just executed is a connected update (an update where we use the same context object to fetch the entity and to update it). But sometimes we can work with disconnected updates. This kind of update action uses different context objects to execute fetch and update actions or sometimes we can receive an object from a client with the Id property set as well, so we don’t have to fetch it from the database. In that situation, all we have to do is to inform EF Core to track changes on that entity and to set its state to modified. We can do both actions with the Update method from our RepositoryBase class. So, you see, having that method is crucial as well.
我们刚刚执行的更新操作是连接更新(我们使用相同的上下文对象来获取实体并对其进行更新的更新)。但有时我们可以处理断开连接的更新。这种更新操作使用不同的上下文对象来执行获取和更新操作,或者有时我们也可以从设置了 Id 属性的客户端接收对象,因此我们不必从数据库中获取它。在这种情况下,我们要做的就是通知 EF Core 跟踪该实体上的更改,并将其状态设置为已修改。我们可以使用 RepositoryBase 类中的 Update 方法执行这两个操作。所以,你看,拥有这种方法也是至关重要的。

One note, though. If we use the Update method from our repository, even if we change just the Age property, all properties will be updated in the database.
不过,有一点需要注意。如果我们使用存储库中的 Update 方法,即使我们只更改 Age 属性,数据库中的所有属性都将更新。

11.2 Inserting Resources while Updating one

While updating a parent resource, we can create child resources as well without too much effort. EF Core helps us a lot with that process. Let’s see how.
在更新父资源时,我们也可以毫不费力地创建子资源。EF Core 在此过程方面为我们提供了很多帮助。让我们看看如何。

The first thing we are going to do is to create a DTO class for update:
我们要做的第一件事是创建一个用于更新的 DTO 类:

//CompanyForUpdateDto.cs

using System.Collections.Generic;

namespace Entities.DataTransferObjects
{
    public class CompanyForUpdateDto
    {
        public string Name { get; set; }
        public string Address { get; set; }
        public string Country { get; set; }
        public IEnumerable<EmployeeForCreationDto> Employees { get; set; }
    }
}

After this, let’s create a new mapping rule:
在此之后,让我们创建一个新的映射规则:

//MappingProfile.cs
CreateMap<CompanyForUpdateDto, Company>();

Right now, we can modify our controller:
现在,我们可以修改我们的控制器:

//CompaniesController.cs
        [HttpPut("{id}")]
        public IActionResult UpdateCompany(Guid id, [FromBody] CompanyForUpdateDto company)
        {
            if (company == null)
            {
                _logger.LogError("CompanyForUpdateDto object sent from client is null.");
                return BadRequest("CompanyForUpdateDto object is null");
            }
            var companyEntity = _repository.Company.GetCompany(id, trackChanges: true);
            if (companyEntity == null)
            {
                _logger.LogInfo($"Company with id: {id} doesn't exist in the database.");
                return NotFound();
            }
            _mapper.Map(company, companyEntity);
            _repository.Save(); return NoContent();
        }

That’s it. You can see that this action is almost the same as the employee update action.
就是这样。您可以看到此操作与员工更新操作几乎相同。

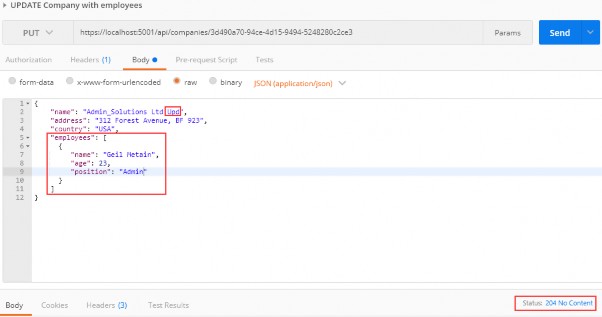
Let’s test this now:
现在让我们测试一下:

{
    "name":"Admin_Solutions Ltd Upd",
    "address":"312 Forest Avenue,BF 923",
    "country":"USA",
    "employees":[
        {
            "name":"Geil Metain",
            "age":23,
            "position":"Admin"
        }
    ]
}

https://localhost:5001/api/companies/3d490a70-94ce-4d15-9494-5248280c2ce3

Alt text

We modify the name of the company and attach an employee as well. As a result, we can see 204, which means that the entity has been updated. But what about that new employee?
我们修改公司名称并附加员工。结果,我们可以看到 204,这意味着实体已更新。但是那个新员工呢?

Let’s inspect our query:
让我们检查一下我们的查询:
Alt text

You can see that we have created the employee entity in the database. So, EF Core does that job for us because we track the company entity. As soon as mapping occurs, EF Core sets the state for the company entity to modified and for all the employees to added. After we call the Save method, the Name property is going to be modified and the employee entity is going to be created in the database.
您可以看到我们已经在数据库中创建了员工实体。因此,EF Core 为我们完成了这项工作,因为我们跟踪公司实体。发生映射后,EF Core 将设置要修改的公司实体和要添加的所有员工的状态。调用 Save 方法后,将修改 Name 属性,并在数据库中创建雇员实体。

We are finished with the PUT requests, so let’s continue with PATCH.
我们已经完成了 PUT 请求,所以让我们继续使用 PATCH。