1 PROJECT CONFIGURATION
Configuration in .NET Core is very different from what we’re used to in .NET Framework projects. We don’t use the web.config file anymore, but instead, use a built-in Configuration framework that comes out-of-the-box in .NET Core.
.NET Core 中的配置与我们习惯 的配置非常不同.NET Framework 项目。我们不再使用 web.config 文件,而是使用在 .NET Core 中开箱即用的内置配置框架。
To be able to develop good applications, we need to understand how to configure our application and its services first.
为了能够开发良好的应用程序,我们需要首先了解如何配置应用程序及其服务。
In this section, we’ll learn about configuration methods in the Startup class and set up our application. We will also learn how to register different services and how to use extension methods to achieve this.
在本节中,我们将了解 Startup 类中的配置方法并设置我们的应用程序。我们还将学习如何注册不同的服务,以及如何使用扩展方法来实现这一目标。
Of course, the first thing we need to do is to create a new project, so, let’s dive right into it.
当然,我们需要做的第一件事就是创建一个新项目,所以,让我们深入研究它。
1.1 Creating a New Project
Let’s open Visual Studio and create a new ASP.NET Core Web Application:
让我们打开Visual Studio并创建一个新的 ASP.NET 核心Web应用程序:

Now let’s choose a name and location for our project:
现在,让我们为项目选择一个名称和位置:
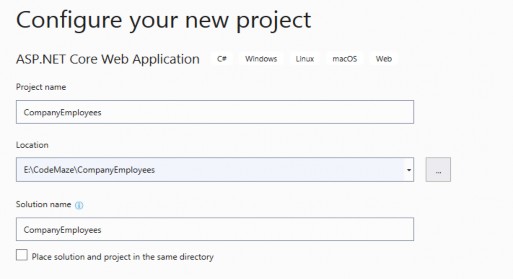
Next, we want to choose a .NET Core and ASP.NET Core 5.0 from the dropdown lists respectively. Also, we don’t want to enable OpenAPI support right now. We’ll do that later in the book on our own. Now we can proceed by clicking the Create button and the project will start initializing:
接下来,我们要分别从下拉列表中选择 .NET Core 和 ASP.NET Core 5.0。此外,我们现在不想启用OpenAPI支持。我们将在本书的后面自己做这件事。现在,我们可以通过单击“创建”按钮继续,项目将开始初始化:
1.2 launchSettings.json File Configuration
After the project has been created, we are going to modify the launchSettings.json file, which can be found in the Properties section of the Solution Explorer window.
创建项目后,我们将修改 launchSettings.json 文件,该文件可在“解决方案资源管理器”窗口的“属性”部分中找到。
This configuration determines the launch behavior of the ASP.NET Core applications. As we can see, it contains both configurations to launch settings for IIS and self-hosted applications (Kestrel).
此配置确定 ASP.NET Core 应用程序的启动行为。正如我们所看到的,它包含启动IIS和自承载应用程序(Kestrel)设置的两种配置。
For now, let’s change the launchBrowser property to false to prevent the web browser from launching on application start.
现在,让我们将 launchBrowser 属性更改为 false,以防止 Web 浏览器在应用程序启动时启动。
{
  "$schema": "http://json.schemastore.org/launchsettings.json",
  "iisSettings": {
    "windowsAuthentication": false,
    "anonymousAuthentication": true,
    "iisExpress": {
      "applicationUrl": "http://localhost:58753",
      "sslPort": 44370
    }
  },
  "profiles": {
    "IIS Express": {
      "commandName": "IISExpress",
      "launchBrowser": false,
      "launchUrl": "weatherforecast",
      "environmentVariables": { "ASPNETCORE_ENVIRONMENT": "Development" }
    },
    "CompanyEmployees": {
      "commandName": "Project",
      "dotnetRunMessages": "true",
      "launchBrowser": false,
      "launchUrl": "weatherforecast",
      "applicationUrl": "https://localhost:5001;http://localhost:5000",
      "environmentVariables": { "ASPNETCORE_ENVIRONMENT": "Development" }
    }
  }
}
This is convenient since we are developing a Web API project and we don’t need a browser to check our API out. We will use Postman (described later) for this purpose.
这很方便,因为我们正在开发一个Web API项目,我们不需要浏览器来检查我们的API。我们将使用Postman(稍后描述)来实现此目的。
If you’ve checked Configure for HTTPS checkbox earlier in the setup phase, you will end up with two URLs in the applicationUrl section — one for HTTP, and one for HTTPS.
如果在设置阶段之前选中了“为 HTTPS 配置”复选框,则最终将在 applicationUrl 部分中得到两个 URL — 一个用于 HTTP,另一个用于 HTTPS。
You’ll also notice the sslPort property which indicates that our application, when running in IISExpress, will be configured for HTTPS (port 44370), too.
您还会注意到 sslPort 属性,该属性指示我们的应用程序在 IISExpress 中运行时也将配置为 HTTPS(端口 44370)。
Additional info: Take note that this HTTPS configuration is only valid in the local environment. You will have to configure a valid certificate and HTTPS redirection once you deploy the application.
其他信息:请注意,此 HTTPS 配置仅在本地环境中有效。部署应用程序后,必须配置有效的证书和 HTTPS 重定向。
There is one more useful property for developing applications locally and that’s the launchUrl property. This property determines which URL will the application navigate to initially. For launchUrl property to work, we need to set the launchBrowser property to true. So, for example, if we set the launchUrl property to weatherforecast, we will be redirected to https://localhost:5001/weatherforecast when we launch our application.
还有一个用于本地开发应用程序有用的属性,那就是 launchUrl 属性。此属性确定应用程序最初将导航到哪个 URL。要使 launchUrl 属性正常工作,我们需要将 launchBrowser 属性设置为 true。因此,例如,如果我们将 launchUrl 属性设置为 weatherforecast,则在启动应用程序时,我们将被重定向到 https://localhost:5001/weatherforecast。
1.3 Program.cs and Startup.cs Explanations
Program.cs is the entry point to our application and it looks like this:
Program.cs是我们应用程序的入口点,它看起来像这样:
namespace CompanyEmployees
{
    public class Program
    {
        public static void Main(string[] args)
        {
            CreateHostBuilder(args).Build().Run();
        }

        public static IHostBuilder CreateHostBuilder(string[] args) =>
            Host.CreateDefaultBuilder(args)
                .ConfigureWebHostDefaults(webBuilder =>
                {
                    webBuilder.UseStartup<Startup>();
                });
    }
}
If you are familiar with how things work in .NET Core 1.0, you will find this code considerably smaller than it used to be.
如果您熟悉 .NET Core 1.0 中的工作方式,您会发现此代码比以前小得多。
You might wonder why some parts are missing like the UseKestrel() or the UseIISIntegration(). The CreateDefaultBuilder(args) method encapsulates all that stuff and makes this code more readable, but it keeps all the magic present. You can still fine grain the configuration if you want to.
您可能想知道为什么缺少某些部分,例如UseKestrel()或UseIISIntegration() 。 CreateDefaultBuilder(args) 方法封装了所有这些东西,并使此代码更具可读性,但它保留了所有神奇的存在。如果需要,您仍然可以细粒度配置。
The CreateDefaultBuilder(args) method sets the default files and variables for the project and logger configuration. The fact that the logger is configured earlier in the bootstrapping process means we can log issues that happen during bootstrapping as well, which was a bit harder in previous versions.
CreateDefaultBuilder(args) 方法为项目和记录器配置设置默认文件和变量。记录器是在引导过程的早期配置的,这意味着我们也可以记录在引导过程中发生的问题,这在以前的版本中有点困难。
After that, we can call webBuilder.UseStartup
之后,我们可以调用webBuilder.UseStartup
When we open the Startup class, we can find the constructor and the two methods which we’ll extend quite a few times during our application development.
当我们打开 Startup 类时,我们可以找到构造函数和两个方法,我们将在应用程序开发过程中扩展它们很多次。
As the method name indicates, the ConfigureServices method is used to do exactly that: configure our services. A service is a reusable part of the code that adds some functionality to our application.
正如方法名称所示,ConfigureServices 方法正是用来做到这一点的:配置我们的服务。服务是代码的可重用部分,它为我们的应用程序添加了一些功能。
In the Configure method, we are going to add different middleware components to the application’s request pipeline.
在 Configure 方法中,我们将向应用程序的请求管道添加不同的中间件组件。
Since larger applications could potentially contain a lot of different services, we can end up with a lot of clutter and unreadable code in the ConfigureServices method. To make it more readable for the next person and ourselves, we can structure the code into logical blocks and separate those blocks into extension methods.
由于较大的应用程序可能包含许多不同的服务,因此我们最终可能会在 ConfigureServices 方法中产生大量混乱和不可读的代码 。为了使下一个人和我们自己更具可读性,我们可以将代码结构为逻辑块,并将这些块分离为扩展方法。
1.4 Extension Methods and CORS Configuration
An extension method is inherently a static method. What makes it different from other static methods is that it accepts this as the first parameter, and this represents the data type of the object which will be using that extension method. We’ll see what that means in a moment.
扩展方法本质上是一种静态方法。它与其他静态方法的不同之处在于,它接受此参数作为第一个参数,这表示将使用该扩展方法的对象的数据类型。我们稍后会明白这意味着什么。
An extension method must be defined inside a static class. This kind of method extends the behavior of a type in .NET. Once we define an extension method, it can be chained multiple times on the same type of object.
必须在静态类中定义扩展方法。此方法扩展了 .NET 中类型的行为。一旦我们定义了一个扩展方法,它就可以在同一类型的对象上多次链接。
So, let’s start writing some code to see how it all adds up.
所以,让我们开始编写一些代码,看看它们是如何加起来的。
We are going to create a new folder Extensions in the project and create a new class inside that folder named ServiceExtensions. The ServiceExtensions class should be static.
我们将在项目中创建一个新的文件夹“Extensions”,并在该文件夹中创建一个名为 ServiceExtensions 的新类。 服务扩展类应为静态。
namespace CompanyEmployees.Extensions
{
    public static class ServiceExtensions
    {
    }
}
Let’s start by implementing something we need for our project immediately so we can see how extensions work.
让我们从立即实现项目所需的内容开始,以便我们可以看到扩展的工作原理。
The first thing we are going to do is to configure CORS in our application. CORS (Cross-Origin Resource Sharing) is a mechanism to give or restrict access rights to applications from different domains.
我们要做的第一件事是在我们的应用程序中配置 CORS。CORS(跨域资源共享)是一种向来自不同域的应用程序授予或限制访问权限的机制。
If we want to send requests from a different domain to our application, configuring CORS is mandatory. So, to start off, we’ll add a code that allows all requests from all origins to be sent to our API:
如果我们要将请求从其他域发送到我们的应用程序,则必须配置 CORS。因此,首先,我们将添加一个代码,允许将来自所有源的所有请求发送到我们的API:
public static void ConfigureCors(this IServiceCollection services) =>
            services.AddCors(options =>
            {
                options.AddPolicy("CorsPolicy", builder =>
                builder.AllowAnyOrigin()
                .AllowAnyMethod()
                .AllowAnyHeader());
            });
We are using basic CORS policy settings because allowing any origin, method, and header is okay for now. But we should be more restrictive with those settings in the production environment. More precisely, as restrictive as possible.
我们使用的是基本的 CORS 策略设置,因为现在允许任何源、方法和标头都是可以的。但是,我们应该在生产环境中对这些设置进行更多限制。更确切地说,尽可能严格。
Instead of the AllowAnyOrigin() method which allows requests from any source, we can use the WithOrigins("https://example.com") which will allow requests only from that concrete source. Also, instead of AllowAnyMethod() that allows all HTTP methods, we can use WithMethods("POST", "GET") that will allow only specific HTTP methods. Furthermore, you can make the same changes for the AllowAnyHeader() method by using, for example, the WithHeaders("accept", "content-type") method to allow only specific headers.
我们可以使用 WithOrigins("https://example.com") 而不是允许来自任何来源的请求的AllowAnyOrigin() 方法,它只允许来自该具体来源的请求。此外,我们可以使用 WithMethods("POST", "GET") 而不是允许所有HTTP方法的 AllowAnyMethod() ,它只允许特定的HTTP方法。此外,您可以对 AllowAnyHeader() 方法进行相同的更改,例如,通过使用WithHeaders("accept", "content-type") 方法来仅允许特定的标头。
1.5 IIS Configuration
ASP.NET Core applications are by default self-hosted, and if we want to host our application on IIS, we need to configure an IIS integration which will eventually help us with the deployment to IIS. To do that, we need to add the following code to the ServiceExtensions class:
ASP.NET Core 应用程序默认为自承载,如果我们要在 IIS 上托管应用程序,则需要配置 IIS 集成,这最终将帮助我们部署到 IIS。为此,我们需要将以下代码添加到 ServiceExtensions 类中:
public static void ConfigureIISIntegration(this IServiceCollection service) =>
            service.Configure<IISOptions>(options => { });
We do not initialize any of the properties inside the options because we are fine with the default values for now. But if you need to fine-tune the configuration right away, you might want to take a look at the possible options:
我们不初始化选项中的任何属性,因为我们现在可以使用默认值。但是,如果您需要立即微调配置,则可能需要查看可能的选项:
Now, we mentioned extension methods are great for organizing your code and extending functionalities. Let’s go back to our Startup class and modify the ConfigureServices and the Configure methods to support CORS and IIS integration now that we’ve written extension methods for those functionalities:
现在,我们提到扩展方法非常适合组织代码和扩展功能。让我们回到 Startup 类,修改 ConfigureServices 和 Configure 方法以支持 CORS 和 IIS 集成,因为我们已经为这些功能编写了扩展方法:
public void ConfigureServices(IServiceCollection services)
        {

            services.ConfigureCors();
            services.ConfigureIISIntegration();

            services.AddControllers();
        }
And let’s add a few mandatory methods to our Configure method:
让我们向 Configure 方法添加一些必需的方法:
public void Configure(IApplicationBuilder app, IWebHostEnvironment env)
        {
            if (env.IsDevelopment())
            {
                app.UseDeveloperExceptionPage();
            }
            else
            {
                app.UseHsts();
            }
            app.UseHttpsRedirection();
            app.UseStaticFiles();

            app.UseCors("CorsPolicy");

            app.UseForwardedHeaders(new ForwardedHeadersOptions
            {
                ForwardedHeaders = ForwardedHeaders.All
            });

            app.UseRouting();
            app.UseAuthorization();
            app.UseEndpoints(endpoints =>
            {
                endpoints.MapControllers();
            });
        }
We’ve added CORS and IIS configuration to the ConfigureServices method. Furthermore, CORS configuration has been added to the application’s pipeline inside the Configuration method. But as you can see, there are some additional methods unrelated to IIS configuration.
我们已将 CORS 和 IIS 配置添加到 ConfigureServices 方法。此外,CORS 配置已添加到Configuration方法内的应用程序管道中。但如您所见,还有一些与 IIS 配置无关的其他方法。
Let’s go through those and learn what they do.
让我们来看看这些,了解它们的作用。
-
app.UseForwardedHeaders() will forward proxy headers to the current request. This will help us during application deployment.
app.UseForwardedHeaders() 会将代理标头转发到当前请求。这将在应用程序部署期间帮助我们。 -
app.UseStaticFiles() enables using static files for the request. If we don’t set a path to the static files directory, it will use a wwwroot folder in our project by default.
app.UseStaticFiles() 允许对请求使用静态文件。默认情况下,如果我们不设置静态文件目录的路径,它将使用wwwroot文件夹中的文件夹。 -
app.UseHsts() will add middleware for using HSTS, which adds the Strict-Transport-Security header.
app.UseHsts() 将添加用于使用 HSTS 的中间件,这会添加 Strict-Transport-Security 标头。
1.6 Additional Code in the Startup class
Configuration from .NET Core 3.1 (and in 5.0) is a bit different than it was in 2.2, so we have to make some changes in the Startup class. First, in the ConfigureServices method, instead of AddMvc() as used in 2.2, now we have AddControllers(). This method registers only the controllers in IServiceCollection and not Views or Pages because they are not required in the Web API project which we are building.
.NET Core 3.1(以及 5.0 中的配置)与 2.2 中的配置略有不同,因此我们必须在 Startup 类中进行一些更改。首先,在 ConfigureServices 方法中,现在我们有 AddControllers()而不是 2.2 中使用的 AddMvc() 。此方法仅注册控制器在 IServiceCollection 中,而不是视图或页面,因为它们在我们正在构建的 Web API 项目中不是必需的。
In the Configure method, we have UseRouting() and UseAuthorization() methods. They add routing and authorization features to our application, respectively.
在 Configure 方法中,我们有 UseRouting() 和 UseAuthorization() 方法。它们分别为我们的应用程序添加了路由和授权功能。
Finally, we have the UseEndpoints() method with the MapControllers() method, which adds an endpoint for the controller’s action to the routing without specifying any routes.
最后,我们有 UseEndpoints() 方法和 MapControllers() 方法,该方法将控制器操作的终结点添加到路由中,而无需指定任何路由。
Microsoft advises that the order of adding different middlewares to the application builder is very important. So the UseRouting() method should be called before the UseAuthorization() method and UseCors() or UseStaticFiles() have to be called before the UseRouting() method.
微软建议,向应用程序构建器添加不同中间件的顺序非常重要。因此, UseRouting() 方法应该在 UseAuthorization() 方法之前调用,UseCors() 或 UseStaticFiles() 必须在 UseRouting() 方法之前调用。
1.7 Environment-Based Setting
While we develop our application, we use the “development” environment. But as soon as we publish our application, it goes to the “production” environment. Development and production environments should have different URLs, ports, connection strings, passwords, and other sensitive information.
在开发应用程序时,我们使用“开发”环境。但是,一旦我们发布了应用程序,它就会进入“生产”环境。开发和生产环境应具有不同的 URL、端口、连接字符串、密码和其他敏感信息。
Therefore, we need to have a separate configuration for each environment and that’s easy to accomplish by using .NET Core-provided mechanisms.
因此,我们需要为每个环境提供单独的配置,这可以通过使用 .NET Core 提供的机制轻松实现。
As soon as we create a project, we are going to see the appsettings.json file in the root, which is our main settings file, and when we expand it we are going to see the appsetings.Development.json file by default. These files are separate on the file system, but Visual Studio makes it obvious that they are connected somehow.
创建项目后,我们将在根目录中看到 appsettings.json 文件,这是我们的主要设置文件,当我们展开它时,我们将看到 appsetings.Development.json 文件。这些文件是分开的,在文件系统上,但Visual Studio清楚地表明它们以某种方式连接在一起。

The apsettings.{EnvironmentSuffix}.json files are used to override the main appsettings.json file. When we use a key-value pair from the original file, we override it. We can also define environment-specific values too.
{EnvironmentSenduix}.json 文件用于覆盖主 appsettings.json 文件。当我们使用原始文件中的键值对时,我们会覆盖它。我们还可以定义特定于环境的值。
For the production environment, we should add another file: appsettings.Production.json:
对于生产环境,我们应该添加另一个文件:appsettings.Production.json:
The appsettings.Production.json file should contain the configuration for the production environment.
appsettings.Production.json 文件应包含生产环境的配置。
To set which environment our application runs on, we need to set up the ASPNETCORE_ENVIRONMENT environment variable. For example, to run the application in production, we need to set it to the Production value on the machine we do the deployment to.
若要设置应用程序在哪个环境中运行,我们需要设置 ASPNETCORE_ENVIRONMENT 环境变量。例如,若要在生产环境中运行应用程序,我们需要在执行部署的计算机上将其设置为“生产”值。
We can set the variable through the command prompt by typing set ASPNETCORE_ENVIRONMENT=Production in Windows or export ASPNET_CORE_ENVIRONMENT=Production in Linux.
我们可以通过命令提示符设置变量,方法是在Windows中键入set ASPNETCORE_ENVIRONMENT=Production 或在Linux中导出ASPNET_CORE_ENVIRONMENT=Production 。
ASP.NET Core applications use the value of that environment variable to decide which appsettings file to use accordingly. In this case, that will be appsettings.Production.json.
ASP.NET Core应用程序使用该环境变量的值来决定相应地使用哪个应用程序设置文件。在这种情况下,这将是appsettings.Production.json.
If we take a look at our launchSettings.json file, we are going to see that this variable is currently set to Development.
如果我们看一下我们的 launchSettings.json 文件,我们将看到此变量当前设置为“开发”。
In the next chapter, we’ll learn how to configure a Logger service because it’s really important to have it configured as early in the project as possible.
在下一章中,我们将学习如何配置 Logger 服务,因为在项目中尽早配置它非常重要。