CHAPTER 2 Building C# Applications
构建 C# 应用程序
Building C# Applications
构建 C# 应用程序
As a C# programmer, you can choose from among numerous tools to build .NET Core applications. The tool (or tools) you select will be based primarily on three factors: any associated costs, the OS you are using to develop the software, and the computing platforms you are targeting. The point of this chapter is to provide the information you need to install the .NET 6 SDK and runtime and to present a first look at Microsoft’s flagship IDEs, Visual Studio Code and Visual Studio.
作为 C# 程序员,您可以从众多工具中进行选择来构建 .NET Core 应用程序。您选择的工具将主要基于三个因素:任何相关成本、用于开发软件的操作系统以及目标计算平台。本章的重点是提供安装 .NET 6 SDK 和运行时所需的信息,并介绍Microsoft旗舰 IDE、Visual Studio Code 和 Visual Studio。
The first part of this chapter will cover setting up your computer with the .NET 6 SDK and runtime.The next section will examine building your first C# application with Visual Studio Code and Visual Studio Community Edition.
本章的第一部分将介绍如何使用 .NET 6 SDK 和运行时设置计算机。下一节将介绍如何使用 Visual Studio Code 和 Visual Studio Community Edition 构建您的第一个 C# 应用程序。
■ Note The screenshots in this and subsequent chapters are from Visual Studio Code v 1.61.2 or Visual Studio 2022 Community Edition v17.0.0 on Windows. If you want to build your applications on a different OS or IDE, this chapter will guide you in the right direction; however, the look and feel of your IDE might differ from the various screenshots in this text.
注意 本章和后续章节中的屏幕截图来自 Windows 上的 Visual Studio Code v 1.61.2 或 Visual Studio 2022 Community Edition v17.0.0。如果您想在不同的操作系统或 IDE 上构建应用程序,本章将指导您朝着正确的方向前进;但是,IDE 的外观可能与本文中的各种屏幕截图不同。
Installing .NET 6
安装 .NET 6
To get started developing applications with C# 10 and .NET 6 (on Windows, macOS, or Linux), the .NET 6 SDK needs to be installed (which also installs the .NET 6 runtime). All of the installs for .NET and .NET Core are located at the convenient www.dot.net. On the home page, click Download and then click “All .NET downloads” under .NET. After clicking “All .NET downloads,” you will see the LTS versions of .NET (6.0) and a link for .NET 6.0. Click “.NET 6.0 (recommended).” Once on that page, select the correct .NET 6 SDK for your operating system. For this book, you will need to install the SDK for .NET Core version 6.0.100 or higher, which also installs the .NET and ASP.NET Core runtimes. If you are using a Windows machine, it will also install the .NET Desktop runtime.
若要开始使用 C# 10 和 .NET 6(在 Windows、macOS 或 Linux 上)开发应用程序,需要安装 .NET 6 SDK(同时安装 .NET 6 运行时)。所有 .NET 和 .NET Core 的安装都位于方便的 www.dot.net。在主页上,单击“下载”,然后单击“.NET”下的“所有 .NET 下载”。单击“所有 .NET 下载”后,您将看到 .NET 的 LTS 版本 (6.0) 和 .NET 6.0 的链接。单击“.NET 6.0(推荐)”。进入该页面后,为操作系统选择正确的 .NET 6 SDK。对于本书,你将需要安装适用于 .NET Core 的 SDK 版本 6.0.100 或更高版本,该版本还会安装 .NET 和 ASP.NET Core 运行时。如果您使用的是 Windows 计算机,它还将安装 .NET Desktop 运行时。
Understanding the .NET Version Numbering Scheme
了解 .NET 版本编号方案
At the time of this writing, the .NET 6 SDK is at version 6.0.100. The first two numbers (6.0) indicate the highest version of the runtime you can target. In this case, that’s 6.0. This means the SDK also supports developing for a lower version of the runtime, such as .NET 5 or .NET Core 3.1. The next number (1) is the quarterly feature band. Since we are currently in the first quarter of the year since the release, it is a 1. The final two numbers (00) indicate the patch version. This is a little bit clearer if you add a separator into the version in your mind and think of the current version as 6.0.1.00.
在撰写本文时,.NET 6 SDK 的版本为 6.0.100。前两个数字 (6.0) 表示可以面向的最高运行时版本。在本例中,这是 6.0。这意味着 SDK 还支持针对较低版本的运行时进行开发,例如 .NET 5 或 .NET Core 3.1。下一个数字 (1) 是季度特征带。由于我们目前处于发布以来的第一季度,因此它是 1。最后两个数字 (00) 表示修补程序版本。如果您在脑海中的版本中添加分隔符并将当前版本视为 6.0.1.00,这一点会更清楚一些。
Confirming the .NET 6 Install确认 .NET 6 安装
To confirm the installation of the SDK and the runtimes, open a command window and use the .NET command-line interface (CLI), dotnet.exe. The CLI has SDK options and commands available. The commands include creating, building, running, and publishing projects and solutions, and you will see examples of those commands later in this text. In this section, we will examine the SDK options, of which there are four, as shown in Table 2-1.
若要确认 SDK 的安装和运行时,请打开命令窗口并使用 .NET 命令行界面 (CLI) dotnet.exe。CLI 具有可用的开发工具包选项和命令。这些命令包括创建、生成、运行和发布项目和解决方案,本文后面将看到这些命令的示例。在本节中,我们将检查 SDK 选项,其中有四个选项,如表 2-1 所示。
Table 2-1. .NET 5 CLI SDK Options
表 2-1. .NET 5 命令行界面开发工具包选项
| Option | Meaning in Life |
|---|---|
| –version |
Display the .NET SDK version in use 显示正在使用的 NET SDK 版本 |
| –info |
Display .NET information 显示 .NET 信息 |
| –list-runtimes |
Display the installed runtimes 显示已安装的运行时 |
| –list-sdks |
Display the installed SDKs 显示已安装的软件开发工具包 |
The –version option displays the highest version of the SDK installed on your machine, or the version specified in a global.json located at or above your current directory. Check the current version of the .NET SDK installed on your machine, enter the following:
-version 选项显示计算机上安装的 SDK 的最高版本,或在当前目录或上方的 global.json 中指定的版本。检查计算机上安装的 .NET SDK 的当前版本,输入以下内容:
dotnet --version
For this book, the result needs to be 6.0.100 (or higher).
对于本书,结果需要为 6.0.100(或更高)。
To show all of the .NET Core Runtimes installed on your machine, enter the following:
若要显示计算机上安装的所有 .NET Core 运行时,请输入以下内容:
dotnet --list-runtimes
There are three different runtimes:
有三种不同的运行时:
-
Microsoft.AspNetCore.App (for building ASP.NET Core applications)
Microsoft.AspNetCore.App(用于构建 ASP.NET 核心应用程序) -
Microsoft.NETCore.App (the foundational runtime for .NET)
Microsoft.NETCore.App(.NET 的基础运行时) -
Microsoft.WindowsDesktop.App (for building WinForms and WPF applications) Microsoft.WindowsDesktop.App
(用于构建 WinForms 和 WPF 应用程序)
If you are running a Windows OS, each of these must be version 6.0.0 (or higher). If you are not on Windows, you will just need the first two, Microsoft.NETCore.App and Microsoft.AspNetCore.App, and also be showing version 6.0.0 (or higher).
如果您运行的是 Windows 操作系统,则其中每个都必须是版本 6.0.0(或更高版本)。如果您不在Windows上,则只需要前两个,Microsoft.NETCore.App 和 Microsoft.AspNetCore.App,并且还显示版本6.0.0(或更高版本)。
Finally, to show all of the SDKs installed, enter the following:
最后,要显示已安装的所有 SDK,请输入以下内容:
dotnet --list-sdks
Again, the version must be 6.0.100 (or higher).
同样,版本必须为 6.0.100(或更高版本)。
Checking For Updates
检查更新
New with .NET 6, the CLI has a new command that checks your installed versions of the .NET/.NET Core SDKs and runtimes for updates. This command is backwards compatible, so it also checks for updates for .NET Core 3.1. It will also inform you if any of the installed SDK or runtimes are out of support (like the 2.x versions). To check the versions, enter the following command:
作为 .NET 6 的新增功能,CLI 有一个新命令,用于检查已安装的 .NET/.NET Core SDK 版本和运行时是否有更新。此命令向后兼容,因此它还会检查.NET Core 3.1.如果任何已安装的 SDK 或运行时不受支持(如 2.x 版本),它还会通知您。要检查版本,请输入以下命令:
dotnet sdk check
The command will not update any of the versions for you, it just reports the status. To update, follow the same procedure outlined above to download and install the new version(s).
该命令不会为您更新任何版本,它只会报告状态。要进行更新,请按照上述相同过程下载并安装新版本。
Use an Earlier Version of the .NET (Core) SDK
使用早期版本的 .NET(核心)SDK
Sometimes you might want to ensure you are using an older version of the .NET SDK. As an example, you are building your production applications using .NET 6. An early release candidate for .NET 7 is available, and you want to start experimenting with it while not putting your production work at risk. While Microsoft states that you can build previous versions of .NET applications with a later SDK, many developers and organizations aren’t comfortable with release candidates, much less early beta/preview releases.
有时,你可能希望确保使用的是旧版本的 .NET SDK。例如,您正在使用 .NET 6 生成生产应用程序。.NET 7 的早期候选版本可用,并且你希望开始试验它,同时又不使生产工作面临风险。虽然Microsoft声明可以使用更高版本的 SDK 生成以前版本的 .NET 应用程序,但许多开发人员和组织对候选版本感到不舒服,更不用说早期测试版/预览版了。
If you need to pin your project to an earlier version of the .NET SDK, you can do that with a global. json file. To create this file, you can use this command, which pins the current folder and all subfolders to SDK version 5.0.400:
如果需要将项目固定到早期版本的 .NET SDK,可以使用全局 JSON 文件执行此操作。若要创建此文件,可以使用以下命令,该命令将当前文件夹和所有子文件夹固定到 SDK 版本 5.0.400:
dotnet new globaljson –sdk-version 5.0.400
This creates a global.json file that looks like this:
这将创建一个如下所示的 global.json 文件:
{
    "sdk": {
        "version": "5.0.400"
    }
}
Running dotnet.exe –version in this directory (or any subdirectory) will return 5.0.400.
在此目录(或任何子目录)中运行 dotnet.exe –version 将返回 5.0.400。
Building .NET Core Applications with Visual Studio
使用 Visual Studio 构建 .NET Core 应用程序
If you have experience building applications using prior versions of Microsoft technologies, you are probably familiar with Visual Studio. The edition names and features sets have changed throughout the life of the product but have settled down since the release of .NET Core. Visual Studio is available in the following editions (for both Window and Mac):
如果您具有使用以前版本的Microsoft技术构建应用程序的经验,则可能熟悉 Visual Studio。版本名称和功能集在产品的整个生命周期中发生了变化,但自 .NET Core 发布以来已稳定下来。Visual Studio 在以下版本中可用(适用于 Window 和 Mac):
-
Visual Studio 2022 Community (free)
Visual Studio 2022 社区(免费) -
Visual Studio 2022 Professional (paid)
视觉工作室 2022 专业版(付费) -
Visual Studio 2022 Enterprise (paid)
Visual Studio 2022 企业版(付费)
The Community and Professional editions are essentially the same. The most significant difference is in the licensing model. Community is licensed for open source, academic, and small-business uses. Professional and Enterprise are commercial products that are licensed for any development, including enterprise development. As one would expect, the Enterprise edition has many additional features compared to the Professional edition.
社区版和专业版基本相同。最显着的区别在于许可模式。社区被许可用于开源、学术和小型企业用途。专业版和企业版是获得任何开发许可的商业产品,包括企业开发。正如人们所期望的那样,与专业版相比,企业版具有许多附加功能。
■ Note For specific licensing details, please go to www.visualstudio.com. licensing Microsoft products can be complex, and this book does not cover the details. For the purposes of writing (and following along with) this book, Community is legal to use.
有关具体的许可详情,请转到 www.visualstudio.com。 许可Microsoft产品可能很复杂,本书不涉及详细信息。出于撰写(并遵循)本书的目的,社区是合法使用的。
All Visual Studio editions ship with sophisticated code editors, integrated debuggers, GUI designers for desktop applications, and much more. Since they all share a common core set of features, the good news is that it is easy to move between them and feel quite comfortable with their basic operation.
所有Visual Studio版本都附带复杂的代码编辑器,集成调试器,用于桌面应用程序的GUI设计器等等。由于它们都具有一组共同的核心功能,因此好消息是很容易在它们之间移动并且对它们的基本操作感到非常舒服。
Installing Visual Studio 2022 (Windows)
安装 Visual Studio 2022 (Windows)
Before using Visual Studio 2022 to develop, execute, and debug C# applications, you need to get it installed. The installation experience changed dramatically with the 2017 version and is worth discussing in more detail. If you have been using 2019, you will find the experience very similar.
在使用 Visual Studio 2022 开发、执行和调试 C# 应用程序之前,需要安装它。2017 版本的安装体验发生了巨大变化,值得更详细地讨论。如果您一直在使用2019,您会发现体验非常相似。
■ Note You can download Visual Studio 2022 Community from www.visualstudio.com/downloads.
您可以从 www.visualstudio.com/downloads 下载 Visual Studio 2022 社区。
The Visual Studio 2022 installation process is now broken down into application-type workloads. This allows you to install just the components you need for the type of applications you plan on building. For example, if you are going to build web applications, you would install the “ASP.NET and web development” workload.
Visual Studio 2022 安装过程现在分解为应用程序类型的工作负载。这允许您仅安装计划构建的应用程序类型所需的组件。例如,如果要构建 Web 应用程序,则需要安装“ASP.NET 和 Web 开发”工作负载。
Another (extremely) significant change is that Visual Studio 2022 supports true side-by-side installation.Note that I am not referring to just previous versions of Visual Studio but to Visual Studio 2022 itself! For example, on my main work computer, I have Visual Studio 2022 Enterprise installed for my professional work and Visual Studio 2022 Community for use in my books, courses, and conference lectures. If you have Professional or Enterprise supplied by your employer, you can still install the Community edition to work on open source projects (or the code in this book).
另一个(非常)重大的变化是 Visual Studio 2022 支持真正的并行安装。请注意,我指的不仅仅是以前版本的 Visual Studio ,而是 Visual Studio 2022 本身!例如,在我的主工作计算机上,我为我的专业工作安装了 Visual Studio 2022 企业版,并为我的书籍、课程和会议讲座安装了 Visual Studio 2022 社区。如果你的雇主提供了专业版或企业版,你仍然可以安装社区版来处理开源项目(或本书中的代码)。
When you launch the installer for Visual Studio 2022 Community, you are presented with the screen shown in Figure 2-1. This screen has all of the workloads available, the option to select individual components, and a summary on the right side showing what has been selected.
启动 Visual Studio 2022 社区的安装程序时,将显示如图 2-1 所示的屏幕。此屏幕包含所有可用的工作负载、选择单个组件的选项,以及右侧显示已选择内容的摘要。
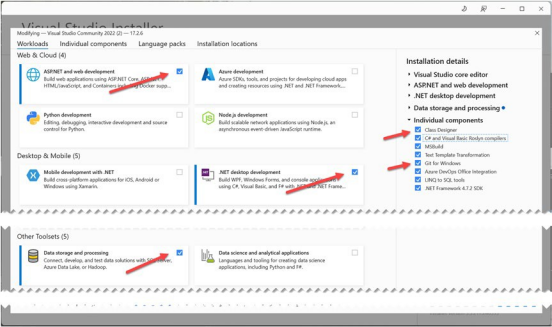
Figure 2-1. The new Visual Studio installer
图 2-1。 新的 Visual Studio 安装程序
For this book, you will want to install the following workloads:
对于本书,您需要安装以下工作负载:
-
.NET desktop development.NET
桌面开发 -
ASP.NET and web development
ASP.NET 和网络开发 -
Data storage and processing
数据存储和处理
On the “Individual components” tab, also select Class Designer and Git for Windows (all under “Code tools”). Once you have all of them selected, click Install. This will provide you with everything you need to work through the examples in this book.
在“单个组件”选项卡上,还选择“类设计器”和“适用于 Windows的 Git”(全部在“代码工具”下)。选择所有这些选项后,单击“安装”。这将为您提供完成本书中示例所需的一切。
Taking Visual Studio 2022 for a Test-Drive
将 Visual Studio 2022 作为试驾
Visual Studio 2022 is a complete IDE for software development using .NET and C#. Let’s take a quick look at Visual Studio by building a simple .NET 6 Console application.
Visual Studio 2022 是一个完整的 IDE,用于使用 .NET 和 C# 进行软件开发。让我们通过构建一个简单的 .NET 6 控制台应用程序来快速了解 Visual Studio。
Using the New Project Dialog and C# Code Editor
使用“新建项目”对话框和 C# 代码编辑器
When you start Visual Studio, you will see the updated Launch dialog, as shown in Figure 2-2. The left side of the dialog has the most recently used solutions, and the right side has options for launching VisualStudio by launching code from a repository, opening an existing project/solution, opening a local folder, or creating a new project. There is also an option to continue without any code, which just launches the Visual Studio IDE.
启动 Visual Studio 时,您将看到更新的“启动”对话框,如图 2-2 所示。对话框的左侧包含最近使用的解决方案,右侧包含用于启动 Visual 的选项通过从存储库启动代码、打开现有项目/解决方案、打开本地文件夹或创建新项目来进行工作室。还有一个选项可以在没有任何代码的情况下继续,它只会启动Visual Studio IDE。

Figure 2-2. The new Visual Studio launch dialog
图 2-2。 新的 Visual Studio 启动对话框
Select the “Create a new project” option, and you will be prompted with the “Create a new project” dialog. As shown in Figure 2-3, recently used templates (if any) are on the left, and all available templates are on the right, including a set of filters and a search box.
选择“创建新项目”选项,系统将提示您“创建新项目”对话框。如图 2-3 所示,最近使用的模板(如果有)位于左侧,所有可用模板位于右侧,包括一组筛选器和一个搜索框。
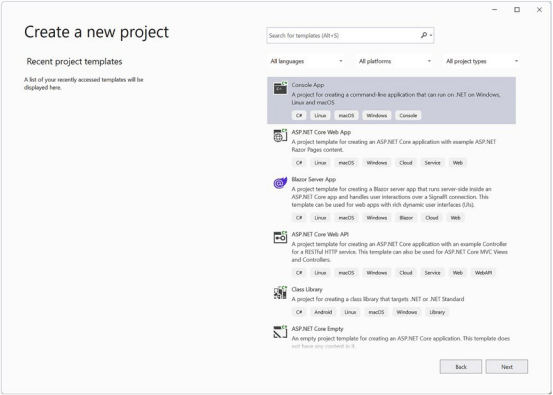
Figure 2-3. The “Create a new project” dialog
图 2-3。 “创建新项目”对话框
To start, create a new Console App, making sure to select the C# version and not the Visual Basic version.
首先,创建一个新的控制台应用,确保选择 C# 版本而不是 Visual Basic 版本。
The next screen is the “Configure your new project” dialog, as shown in Figure 2-4. Enter SimpleCSharpConsoleApp for the project name and select a location for the project. The wizard will also create a Visual Studio solution, by default named after the project name.
下一个屏幕是“配置新项目”对话框,如图 2-4 所示。输入 SimpleCSharpConsoleApp 作为项目名称,并选择项目的位置。该向导还将创建一个 Visual Studio 解决方案,默认情况下以项目名称命名。
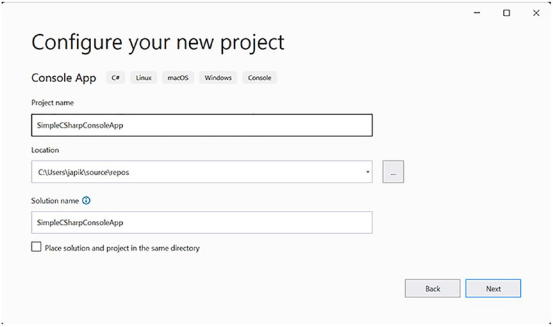
Figure 2-4. The “Configure your new project” dialog
图 2-4。 “配置新项目”对话框
Note Creating solutions and projects can also be accomplished using the .nET Core Command line Interface (ClI). This will be covered with Visual Studio Code.
注意 还可以使用 .nET Core 命令行界面 (ClI) 创建解决方案和项目。这将在Visual Studio Code中介绍。
The next screen prompts for the version of .NET to use. Make sure “.NET 6.0 (Long-term support)” is selected, as shown in Figure 2-5.
下一个屏幕提示要使用的 .NET 版本。确保选中“.NET 6.0(长期支持)”,如图 2-5 所示。
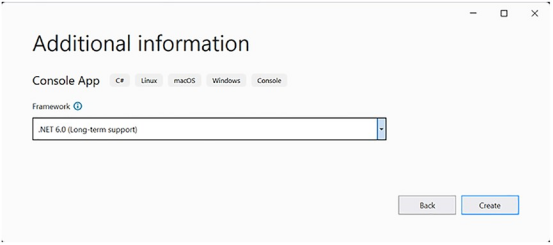
Figure 2-5. Chosing the .NET Version
图 2-5。 选择 .NET 版本
Once the project has been created, you will see that the initial C# code file (named Program.cs) has been opened in the code editor. The initial template just has a comment (the line starting with //) and a single line of code that writes “Hello, World!” to the console:
创建项目后,您将看到初始 C# 代码文件(名为 Program.cs)已在代码编辑器中打开。初始模板只有一个注释(以 // 开头的行)和一行代码,将“Hello, World!”写入控制台。
// See https://aka.ms/new-console-template for more information
//有关更多信息,请参阅 https://aka.ms/new-console-template

Console.WriteLine("Hello, World!");
Those two lines of code are referred to as top level statements and serve as the entry point into the application. The next chapter covers top level statements and application entry points in detail. For now, realize that this is where the execution starts for your app, and ends when all of the lines have executed.
这两行代码称为顶级语句,用作应用程序的入口点。下一章将详细介绍顶级语句和应用程序入口点。现在,请注意,这是应用的执行开始位置,并在所有行都执行完毕后结束。
Replace the comment and the single line of code with the following:
将注释和单行代码替换为以下内容:
// Set up Console UI (CUI)
// 设置 Console UI (CUI)

Console.Title = "My Rocking App";
Console.ForegroundColor = ConsoleColor.Yellow;
Console.BackgroundColor = ConsoleColor.Blue;
Console.WriteLine("*************************************");
Console.WriteLine("***** Welcome to My Rocking App *****");
Console.WriteLine("*************************************");
Console.BackgroundColor = ConsoleColor.Black;

// Wait for Enter key to be pressed.
// 等待按回车键。
Console.ReadLine();
Note You will notice as you type, Visual Studio attempts to complete the words for you. This is called IntelliSense (code completion help) and is integrated into Visual Studio and Visual Studio Code.
您会注意到,当您键入时,Visual Studio 会尝试为您完成单词。这称为IntelliSense(代码完成帮助),并集成到Visual Studio和Visual Studio Code中。
Here, you are using the Console class defined in the System namespace. The System namespace is included as part of the global implicit using statements, so it isn’t explicitly needed. This program does not do anything too interesting; however, note the final call to Console.ReadLine(). This is in place simply to ensure the user must press a key to terminate the application. With Visual Studio 2022, this is unnecessary as the VS debugger will pause the program and prevent it from exiting. If you were to navigate to the compiled version and run it, the program would disappear almost instantly when debugging the program!
在这里,您将使用在系统命名空间中定义的控制台类。System 命名空间作为全局隐式 using 语句的一部分包含在内,因此不需要它。该程序不会做任何太有趣的事情;但是,请注意对 Console.ReadLine() 的最后一次调用。这样做只是为了确保用户必须按某个键才能终止应用程序。在 Visual Studio 2022 中,这是不必要的,因为 VS 调试器将暂停程序并阻止其退出。如果要导航到编译版本并运行它,则在调试程序时,程序几乎会立即消失!
■ Note If you want to change the VS debugging experience to automatically end the program, select Tools ➤Options ➤ Debugging ➤ automatically close the console when debugging stops.
如果要更改 VS 调试体验以自动结束程序,请选择“工具”➤选项 ➤ 调试 ➤ 调试停止时自动关闭控制台。
Changing the Target .NET Core Framework
更改目标 .NET Core 框架
When creating this project, you selected the version of .NET that you wanted to use. If you chose the wrong one (or want to change it for some other reason), double-click the project name in Solution Explorer. This opens the project file in the editor (this feature was introduced with Visual Studio 2019 and .NET Core).You can also edit the project file by right-clicking the project name in Solution Explorer and selecting “Edit Project file.” You will see the following:
创建此项目时,选择了要使用的 .NET 版本。如果选择了错误的项目名称(或出于其他原因想要更改它),请在“解决方案资源管理器”中双击项目名称。这将在编辑器中打开项目文件(此功能随 Visual Studio 2019 和 .NET Core 一起引入)。还可以通过在“解决方案资源管理器”中右键单击项目名称并选择“编辑项目文件”来编辑项目文件。您将看到以下内容:
<Project Sdk="Microsoft.NET.Sdk">
    <PropertyGroup>
        <OutputType>Exe</OutputType>
        <TargetFramework>net6.0</TargetFramework>
        <ImplicitUsings>enable</ImplicitUsings>
        <Nullable>enable</Nullable>
    </PropertyGroup>
</Project>
To change the .NET version to version 5, for example, simply change the TargetFramework value to net5.0, as shown here:
例如,若要将 .NET 版本更改为版本 5,只需将 TargetFramework 值更改为 net5.0,如下所示:
<Project Sdk="Microsoft.NET.Sdk">
    <PropertyGroup>
        <OutputType>Exe</OutputType>
        <TargetFramework>net5.0</TargetFramework>
        <ImplicitUsings>enable</ImplicitUsings>
        <Nullable>enable</Nullable>
        </PropertyGroup>
    </Project>
You can also change the target framework by right-clicking the project name in Solution Explorer and selecting Properties, opening the Application tab, and updating the Target Framework value, as shown in Figure 2-6.
还可以通过在“解决方案资源管理器”中右键单击项目名称并选择“属性”,打开“应用程序”选项卡并更新“目标框架”值来更改目标框架,如图 2-6 所示。
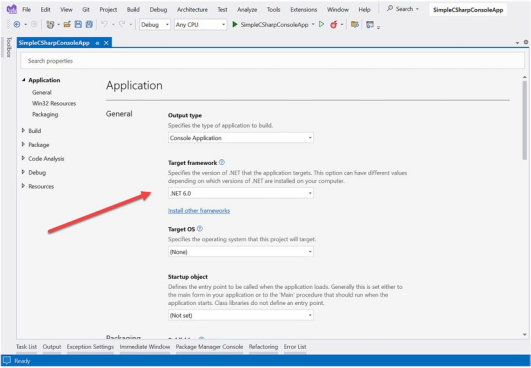
Figure 2-6. Changing the target framework for your application
图 2-6。 更改应用程序的目标框架
Using C# 10 Features
使用 C# 10 功能
In versions of .NET and the .NET Framework, the version of C# supported by a project could be changed. Since the release of .NET Core 3.0 (and each subsequent.NET version), the version of C# used is tied into the .NET Core/.NET version. For .NET 6.0 projects, the language version is locked into C# 10. Table 2-2 lists the target frameworks (.NET, .NET Core, .NET Standard, and .NET Framework) and the default C# version utilized.
在 .NET 和 .NET Framework 版本中,可以更改项目支持的 C# 版本。自 .NET Core 3.0(以及每个 subsequent.NET 版本)发布以来,使用的 C# 版本与 .NET Core/.NET 版本相关联。对于 .NET 6.0 项目,语言版本锁定在 C# 10 中。表 2-2 列出了目标框架(.NET、.NET Core、.NET Standard 和 .NET Framework)和所使用的默认 C# 版本。
Table 2-2. C# 8 Version and Target Framework 表 2-2. C# 8 版本和目标框架
| Target Framework 目标框架 | Version 版本 | C# Language Version Default C#语言版本 |
|---|---|---|
| .NET | 6.x | C# 10.0 |
| .NET | 5.x | C# 9.0 |
| .NET Core | 3.x | C# 8.0 |
| .NET Core | 2.x | C# 7.3 |
| .NET Standard | 2.1 | C# 8.0 |
| .NET Standard | 2.0 | C# 7.3 |
| .NET Standard | 1.x | C# 7.3 |
| .NET Framework | all | C# 7.3 |
Running and Debugging Your Project
运行和调试项目
To run your program and see the output, press the Ctrl+F5 keyboard command (which is also accessed from the Debug ➤ Start Without Debugging menu option). Once you do, you will see a Windows console window pop on the screen with your custom (and colorful) message. Be aware that when you “run” your program with Ctrl+F5, you bypass the integrated debugger.
若要运行程序并查看输出,请按 Ctrl+F5 键盘命令(也可从“调试”➤“启动(不调试)菜单选项访问该命令)。完成后,您将看到屏幕上弹出一个Windows控制台窗口,其中包含自定义(和彩色)消息。请注意,使用 Ctrl+F5 “运行”程序时,会绕过集成调试器。
■ Note .NET applications can also be compiled and executed using the ClI. To run your project, enter dotnet run in the same directory as the project file (SimpleCSharpApp.csproj in this example). The dotnet run command also automatically builds the project.
.NET 应用程序也可以使用 ClI 编译和执行。若要运行项目,请在与项目文件相同的目录中输入 dotnet run(在此示例中为 SimpleCSharpApp.csproj)。dotnet run 命令也会自动生成项目。
If you need to debug your code (which will certainly be important when building larger programs), your first step is to set breakpoints at the code statement you want to examine. Although there is not much code in this example, set a breakpoint by clicking the leftmost gray bar of the code editor (note that breakpoints are marked with a red dot icon; see Figure 2-7).
如果需要调试代码(这在构建大型程序时肯定很重要),第一步是在要检查的代码语句处设置断点。尽管此示例中的代码不多,但请通过单击代码编辑器最左侧的灰色条来设置断点(请注意,断点用红点图标标记;请参阅图 2-7)。
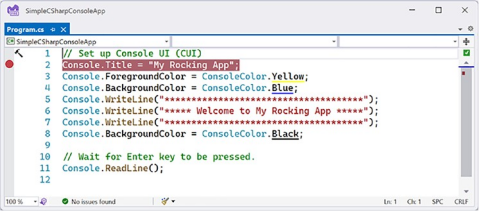
Figure 2-7. Setting breakpoints
图 2-7。 设置断点
If you now press the F5 key (or use the Debug ➤ Start Debugging menu option or click the green arrow with Start next to it in the toolbar), your program will halt at each breakpoint. As you would expect, you can interact with the debugger using the various toolbar buttons and menu options of the IDE. Once you have evaluated all breakpoints, the application will eventually terminate once the statements have completed.
如果现在按 F5 键(或使用“调试”➤“启动调试”菜单选项,或单击工具栏中旁边带有“开始”的绿色箭头),则程序将在每个断点处停止。如您所料,您可以使用 IDE 的各种工具栏按钮和菜单选项与调试器进行交互。评估所有断点后,应用程序最终将在语句完成后终止。
■ Note Microsoft IDEs have sophisticated debuggers, and you will learn about various techniques over the chapters to come. For now, be aware that when you are in a debugging session, a large number of useful options will appear under the Debug menu. Take a moment to verify this for yourself.
请注意Microsoft IDE 具有复杂的调试器,您将在后面的章节中了解各种技术。现在,请注意,当您处于调试会话中时,“调试”菜单下将出现大量有用的选项。花点时间自己验证一下。
Using Solution Explorer
使用解决方案资源管理器
If you look to the right of the text editor, you will see the Solution Explorer window, which shows you a few important things. First, notice that the new project wizard has created a solution along with the single project. This can be confusing at first, as they both have been given the same name
(SimpleCSharpConsoleApp). The idea here is that a “solution” can contain multiple projects that all work together. For example, your solution might include three class libraries, one WPF application, and one ASP. NET Core web service. The earlier chapters of this book will almost always have a single for the example code; however, when you build some more complex examples, you will see how to add new projects to your initial solution.
如果查看文本编辑器的右侧,将看到“解决方案资源管理器”窗口,其中显示了一些重要内容。首先,请注意,新建项目向导已与单个项目一起创建了一个解决方案。起初这可能会令人困惑,因为它们都被赋予了相同的名称(SimpleCSharpConsoleApp)。这里的想法是,一个“解决方案”可以包含多个协同工作的项目。例如,您的解决方案可能包括三个类库、一个 WPF 应用程序和一个 ASP. NET Core Web 服务。本书前面的章节几乎总是有一个示例代码;但是,当您生成一些更复杂的示例时,您将看到如何将新项目添加到初始解决方案中。
■ Note Be aware that when you select the solution in the Solution Explorer window, the IDE’s menu system will show you a different set of choices than when you select a project. If you ever find yourself wondering where a certain menu item has disappeared to, double-check you did not accidentally select the wrong node.
请注意,在“解决方案资源管理器”窗口中选择解决方案时,IDE 的菜单系统将显示一组与选择项目时不同的选项集。如果您发现自己想知道某个菜单项消失到哪里,请仔细检查您是否意外选择了错误的节点。
Using the Visual Class Diagram Tool
使用可视类图工具
Visual Studio also gives you the ability to design classes and other types (such as interfaces or delegates) in a visual manner. The Class Diagram provides tools that allow you to create, view, and modify the objects in your project and their relationships with other objects. Using this tool, you are able to visually add (or remove) members to (or from) a type and have your modifications reflected in the corresponding C# file. Also, as you modify a given C# file, changes are reflected in the class diagram.
Visual Studio 还使您能够以可视方式设计类和其他类型(如接口或委托)。类图提供了一些工具,可用于创建、查看和修改项目中的对象及其与其他对象的关系。使用此工具,可以直观地向类型添加(或删除)成员,并将修改反映在相应的 C# 文件中。此外,修改给定的 C# 文件时,更改将反映在类图中。
■ Note This book only uses the Class Diagram tool occasionally to accentuate certain concepts. It is shown here for completeness, and the choice to use it or the text editor is entirely up to you. The overwhelming majority of the examples use the text editor of Visual Studio/Visual Studio Code.
本书只是偶尔使用类图工具来强调某些概念。此处显示它是为了完整性,使用它还是文本编辑器完全取决于您。绝大多数示例使用Visual Studio/Visual Studio Code的文本编辑器。
To access the visual class designer tools, the first step is to insert a new class diagram file. To do so, select project in the Solution Explorer, then activate the Project ➤ Add New Item menu option and locate the Class Diagram type (Figure 2-8). 若要访问可视化类设计器工具,第一步是插入新的类图文件。为此,请在“解决方案资源管理器”中选择“项目”,然后激活“项目”➤“添加新项”菜单选项并找到“类图”类型(图 2-8)。

Figure 2-8. Inserting a class diagram file into the current project
图 2-8。 将类关系图文件插入到当前项目中
Initially, the designer will be empty; however, you can drag and drop files from your Solution Explorer window on the surface or right click on the design surface to create new classes. To get started, create a new class in your project by right clicking on the project and selecting Add ➤ Class. In the Add New Item – SimpleCSharpConsoleApp dialog, select Class, and name it Car.cs, as shown in Figure 2-9.
最初,设计器将是空的;但是,可以将文件从“解决方案资源管理器”窗口拖放到图面上,或右键单击设计图面以创建新类。要开始使用,请在项目中创建一个新类,方法是右键单击该项目并选择添加 ➤ 类。在“添加新项 – SimpleCSharpConsoleApp”对话框中,选择“类”,并将其命名为 Car.cs,如图 2-9 所示。
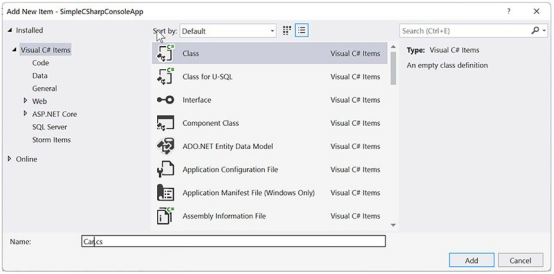
Figure 2-9. The Add New Item Dialog
图 2-9。 “添加新项”对话框
Update the code to the following to create a Car class (you will learn all about classes over the next few chapters):
将代码更新为以下内容以创建 Car 类(您将在接下来的几章中了解有关类的所有信息):
namespace SimpleCSharpConsoleApp;
public class Car
{
    public string PetName { get; set; }
    public string Make { get; set; }
}
After saving the file, drag the Car.cs file from the Solution Explorer onto the Class Diagram. Once you do this, you will find a visual representation of the class. If you click the arrow icon for a given type, you can show or hide the type’s members. Underneath the Class Diagram is the Class Details window, which shows the specifics of the selected class diagram (see Figure 2-10).
保存文件后,将 Car.cs 文件从解决方案资源管理器拖到类图上。完成此操作后,您将找到类的可视化表示形式。如果单击给定类型的箭头图标,则可以显示或隐藏该类型的成员。“类图”下方是“类详细信息”窗口,其中显示了所选类图的细节(请参阅图 2-10)。
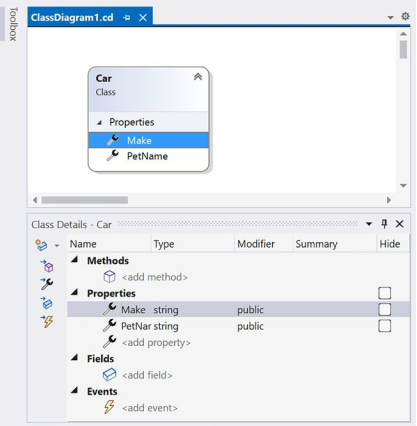
Figure 2-10. The Class Diagram viewer
图 2-10。 类图查看器
■ Note using the Class Designer toolbar, you can fine-tune the display options of the designer surface.
使用类设计器工具栏,可以微调设计器图面的显示选项。
The Class Details window not only shows you the details of the currently selected item in the diagram but also allows you to modify existing members and insert new members on the fly.
“类详细信息”窗口不仅显示关系图中当前选定项的详细信息,还允许您修改现有成员并动态插入新成员。
The Class Designer Toolbox allows you to insert new types (and create relationships between these types) into your project visually (see Figure 2-11). (Be aware you must have a class diagram as the active window to view this toolbox.) As you do so, the IDE automatically creates new C# type definitions in the background.
使用类设计器工具箱,可以直观地将新类型(并在这些类型之间创建关系)插入到项目中(请参见图 2-11)。(请注意,必须将类图作为活动窗口才能查看此工具箱。执行此操作时,IDE 会在后台自动创建新的 C# 类型定义。

Figure 2-11. The Class Designer Toolbox
图 2-11。 类设计器工具箱
By way of example, drag a new class from the Class Designer Toolbox onto your Class Designer. Name this class Make with public access and select Create new file. This will result in the creation of a new C# file named Make.cs that is automatically added to your project. Now, using the Class Details window, add a public string property named Name (see Figure 2-12).
例如,将一个新类从“类设计器工具箱”拖到“类设计器”上。将此类命名为“具有公共访问权限的 Make”,然后选择“创建新文件”。这将导致创建一个名为 Make.cs 的新 C# 文件,该文件会自动添加到项目中。现在,使用“类详细信息”窗口,添加一个名为 Name 的公共字符串属性(请参见图 2-12)。
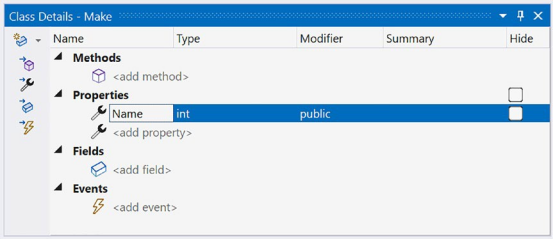
Figure 2-12. Adding a property with the Class Details window
图 2-12。 使用“类详细信息”窗口添加属性
If you now look at the C# definition of the Make class, you will see it has been updated accordingly:
如果现在查看 Make 类的 C# 定义,将看到它已相应地更新:
using System;
using System.Collections.Generic;
using System.Linq;
using System.Text;
namespace SimpleCSharpConsoleApp
{
    public class Make
    {
        public int Name
        {
            get => default;
            set { }
        }
    }
}
■ Note Don’t worry about the extra using statements or the syntax of property. This will all be covered in subsequent chapters.
不要担心额外的 using 语句或属性语法。这些都将在后续章节中介绍。
Now, activate the designer file once again and drag another new class onto the designer and name it SportsCar. Click the Inheritance icon in the Class Designer Toolbox and click the top of the SportsCar icon. Next, click the mouse on top of the Car class icon. If you performed these steps correctly, you have just derived the SportsCar class from Car (see Figure 2-13).
现在,再次激活设计器文件,并将另一个新类拖到设计器上并将其命名为 SportsCar。单击“类设计器工具箱”中的“继承”图标,然后单击跑车的顶部图标。接下来,单击汽车类图标顶部的鼠标。如果正确执行了这些步骤,则刚刚从 Car 派生了 SportsCar 类(请参阅图 2-13)。
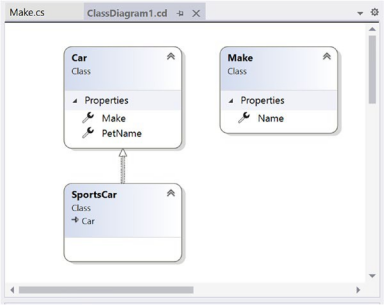
Figure 2-13. Visually deriving from an existing class
图 2-13。 从现有类直观派生
■ Note The concept of inheritance will be fully examined in Chapter 6.
注意继承的概念将在第6章中全面讨论。
To complete this example, update the generated SportsCar class with a public method namedGetPetName(), authored as follows:
若要完成此示例,请使用名为GetPetName(),编写如下:
public class SportsCar : Car
{
    public string GetPetName()
    {
        PetNam" = ""red";
        return PetName;
    }
}
As you would expect, the designer shows the added method to the SportsCar class.
如您所料,设计器显示了添加到 SportsCar 类的方法。
This concludes your first look at Visual Studio. Now let’s look at the most recent addition to the Visual Studio family, Visual Studio Code.
你对Visual Studio的第一次了解到此结束。现在让我们看看Visual Studio系列的最新成员Visual Studio Code。
Building .NET Core Applications with Visual Studio Code
使用 Visual Studio Code 构建 .NET Core 应用程序
Another popular IDE from Microsoft is Visual Studio Code (VS Code). Visual Studio Code is a relatively new edition to the Microsoft family; is free, open source, and cross-platform; and has gained significant adoption among developers in and out of the .NET ecosystem. The focus of Visual Studio Code is (as the name suggests) the code of your application. While it does not have many of the built-in features that are included in Visual Studio, it is extremely fast, and additional functionality (like different language support) can be added through extensions. This allows you to have a fast IDE customized for your workflow. Many samples in this book are built and tested with Visual Studio Code. You can download it here:
Microsoft另一个流行的IDE是Visual Studio Code(VS Code)。Visual Studio Code是Microsoft系列中相对较新的版本;免费、开源和跨平台;并在 .NET 生态系统内外的开发人员中获得了广泛的采用。Visual Studio Code 的重点是(顾名思义)应用程序的代码。虽然它没有Visual Studio中包含的许多内置功能,但它非常快,并且可以通过扩展添加其他功能(如不同的语言支持)。这允许您为工作流自定义快速 IDE。本书中的许多示例都是使用 Visual Studio Code 构建和测试的。您可以在此处下载:https://code.visualstudio.com/download
After installing VS Code, you will want to add the C# extension found here:
安装 VS Code 后,需要添加在此处找到的 C# 扩展:
https://marketplace.visualstudio.com/items?itemName=ms-dotnettools.csharp
■ Note Visual Studio Code is used to develop many different types of applications based on a multitude of languages. There are extensions for angular, View, php, Java, and many, many, more.
注意 Visual Studio Code 用于开发基于多种语言的许多不同类型的应用程序。有angular,View,php,Java等扩展。
Taking Visual Studio Code for a Test-Drive
使用 Visual Studio 写代码
Let’s take a quick look at Visual Studio Code by building the same .NET 6 Console application from the Visual Studio example.
让我们通过从Visual Studio示例构建相同的.NET 6 Console应用程序来快速浏览Visual Studio Code。
Creating Solutions and Projects
创建解决方案和项目
When you start Visual Studio Code, you are presented with a blank slate. Creating solutions and projects must be done through the .NET 6 command-line interface, also known as the CLI. To start, open a folder with Visual Studio Code by selecting File ➤ Open Folder, and navigate through the explorer window to where you want your solution and project to live. Next, open a terminal window by selecting Terminal ➤ New Terminal or by pressing Ctl+. 当你启动Visual Studio Code时,你会看到一个空白的石板。必须通过 .NET 6 命令行界面(也称为 CLI)创建解决方案和项目。首先,通过选择“文件”➤“打开文件夹”,使用 Visual Studio Code 打开文件夹,然后在资源管理器窗口中导航到希望解决方案和项目所在的位置。接下来,通过选择终端 ➤ 新建终端或按 Ctl+ 打开终端窗口。(键盘上数字1左边的键)
In the terminal window, enter the following command to create an empty .NET 5 solution file:
在终端窗口中,输入以下命令以创建空的 .NET 5 解决方案文件:
dotnet new sln -n SimpleCSharpConsoleApp -o .\VisualStudioCode
This creates a new solution file with the name (-n) SimpleCSharpConsoleApp in a subdirectory (of the current directory) named VisualStudioCode. When using Visual Studio Code with a single project app, there is no need to create a solution file. Visual Studio is solution centric; Visual Studio Code is code centric. We created a solution file here to duplicate the process in the Visual Studio example.
这将在名为 VisualStudioCode 的子目录(当前目录)中创建一个名为 (-n) SimpleCSharpConsoleApp 的新解决方案文件。将 Visual Studio Code 与单个项目应用程序一起使用时,无需创建解决方案文件。Visual Studio以解决方案为中心;Visual Studio Code以代码为中心。我们在此处创建了一个解决方案文件,用于复制 Visual Studio 示例中的过程。
■ Note These examples use the Windows directory separators. adjust the separators based on your operating system.
这些示例使用 Windows 目录分隔符。 根据您的操作系统调整分隔符。
Next, create a new C# 9/.NET 5 (-f net6.0) console application named (-n) SimpleCSharpConsoleApp in a subdirectory (-o) of the same name (note that this command must be all on one line):
接下来,在同名的子目录 (-o) 中创建一个名为 (-n) 的 SimpleCSharpConsoleApp 的新 C# 9/.NET 5 (-f net6.0) 控制台应用程序(请注意,此命令必须全部在一行上):
dotnet new console -lang c# -n SimpleCSharpConsoleApp -o .\VisualStudioCode\ SimpleCSharpConsoleApp -f net6.0
Finally, add the newly created project to the solution with the following command:
最后,使用以下命令将新创建的项目添加到解决方案中:
dotnet sln .\VisualStudioCode\SimpleCSharpConsoleApp.sln add .\VisualStudioCode\ SimpleCSharpConsoleApp
■ Note This is just a small sample of what the ClI is capable of. To discover everything the ClI can do, enter dotnet -h.
这只是 ClI 功能的一小部分示例。要了解 ClI 可以执行的所有操作,请输入dotnet -h.
Exploring the Visual Studio Code Workspace
探索 Visual Studio Code Workspace
As you can see in Figure 2-14, the Visual Studio Code workspace is focused on the code, but also provides a lot of additional features to aid your productivity. The explorer (1) is an integrated file explorer andis selected in the figure. The Source Control (2) integrates with Git. The Debug icon (3) launches the appropriate debugger (once the correct extension is installed). The next one down is the extension manager (4). The extension manager is context sensitive and will make recommendations based on the type of code in the open directory and subdirectories.
如图 2-14 所示,Visual Studio Code 工作区侧重于代码,但也提供了许多附加功能来帮助提高工作效率。资源管理器 (1) 是一个集成的文件浏览器和在图中被选中。源代码管理 (2) 与 Git 集成。调试图标 (3) 启动相应的调试器(安装正确的扩展后)。下一个是扩展管理器 (4)。扩展管理器与上下文相关,将根据打开目录和子目录中的代码类型提出建议。
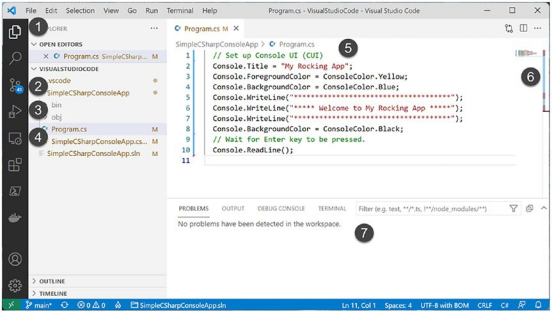
Figure 2-14. The Visual Studio Code workspace
图 2-14。 Visual Studio Code 工作区
The code editor (5) is complete with color coding and IntelliSense support. The code map (6) shows the map of your entire code file, and the Problems/Output/Debug Console/Terminal window (7) receives the output from debug sessions and accepts input from the user.
代码编辑器 (5) 具有颜色编码和智能感知支持。代码图 (6) 显示整个代码文件的映射,问题/输出/调试控制台/终端窗口 (7) 接收来自调试会话的输出并接受来自用户的输入。
Restoring Packages, Building and Running Programs
恢复包,构建和运行程序
The .NET 6 CLI has all of the power needed to create and build solutions and projects, add and restore NuGet packages, and run applications. To restore all of the NuGet packages required for your solution and project, enter the following command in the terminal window (or a command window outside of VS Code), making sure to run the command from the same directory as the solution file:
.NET 6 CLI 具有创建和生成解决方案和项目、添加和还原 NuGet 包以及运行应用程序所需的所有功能。若要还原解决方案和项目所需的所有 NuGet 包,请在终端窗口(或 VS Code 外部的命令窗口)中输入以下命令,确保从与解决方案文件相同的目录运行命令:
dotnet restore
■ Note using dotnet build also restores all of the nuget packages.
使用 dotnet 生成还会还原所有 nuget 包。
To restore and build all of the projects in your solution, execute the following in the terminal/command window (again, making sure the command is executed in the same directory as the solution file):
若要还原和生成解决方案中的所有项目,请在终端/命令窗口中执行以下命令(再次确保命令在与解决方案文件相同的目录中执行):
dotnet build
■ Note When dotnet restore and dotnet build are executed in a directory that contains a solution file, all of the projects in the solution are acted on. The commands can also be run on a single project by running the command in the directory of the C# project file (.csproj).
在包含解决方案文件的目录中执行 dotnet 还原和 dotnet 生成时,将执行解决方案中的所有项目。还可以通过在 C# 项目文件 (.csproj) 的目录中运行命令来在单个项目上运行这些命令。
To run your project without debugging, execute the following .NET CLI command in the same directory as the project file (SimpleCSharpConsoleApp.csproj):
若要在不调试的情况下运行项目,请在与项目文件 (SimpleCSharpConsoleApp.csproj) 相同的目录中执行以下 .NET CLI 命令:
dotnet run
Debugging Your Project
调试项目
To debug your program after setting a break point, click the Debug icon (2 in Figure 2-14), then click Run and Debug (Figure 2-15).
若要在设置断点后调试程序,请单击“调试”图标(图 2-2 中的 14),然后单击“运行和调试”(图 2-15)。
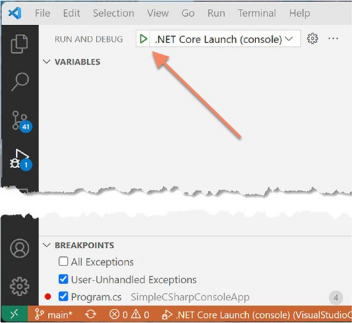
Figure 2-15. Run and Debug in Visual Studio Code
图 2-15。 在 Visual Studio Code 中运行和调试
Finding the .NET Core and C# Documentation
查找 .NET Core 和 C# 文档
The C# and .NET Core documentation are both extremely good, very readable, and full of useful information. Given the huge number of predefined .NET types (which number well into the thousands), you must be willing to roll up your sleeves and dig into the provided documentation. You can view all of the Microsoft documentation here:
C# 和 .NET Core 文档都非常好,非常易读,并且充满了有用的信息。鉴于预定义的 .NET 类型数量庞大(数量达到数千种),您必须愿意卷起袖子并深入研究提供的文档。您可以在此处查看所有Microsoft文档:
https://docs.microsoft.com/en-us/dotnet/csharp/
The areas that you will use the most in the first half of this book are the C# documentation and the .NET Core documentation, found at the following locations:
在本书的前半部分,您将使用最多的区域是 C# 文档和 .NET Core 文档,它们位于以下位置:https://docs.microsoft.com/en-us/dotnet/csharp/ https://docs.microsoft.com/en-us/dotnet/core/
Summary
总结
The point of this chapter was to provide you the information to set up your development environment with the .NET 6 SDK and runtimes as well as provide a tour of Visual Studio 2022 Community Edition and Visual Studio Code. If you are interested in building cross-platform .NET Core applications, you have a host of choices. Visual Studio (Windows only), Visual Studio for the Mac (Mac only), and Visual Studio Code (cross platform) are all supplied by Microsoft. Building WPF or WinForms applications still requires Visual Studio on a Windows machine.
本章的要点是为您提供使用 .NET 6 SDK 和运行时设置开发环境的信息,并提供 Visual Studio 2022 社区版和 Visual Studio 代码的教程。如果您对构建跨平台的 .NET Core 应用程序感兴趣,则有很多选择。Visual Studio(仅限Windows),Visual Studio for the Mac(仅限Mac)和Visual Studio Code(跨平台)均由Microsoft提供。构建WPF或WinForms应用程序仍然需要在Windows机器上构建Visual Studio。